wacom_logo_nb_c.png

UPDATE October 16:  The problems with latest set of Wacom Feel IT drivers for the Surface Pro and other penabled tablet pcs are apparently caused by issues with upgrade installations.

I was contacted yesterday by Wacom representative Mike Bagdanoff.  After asking a series of diagnostic questions, he concluded "You have found an interesting upgrade issue."

Bagdanoff detailed the following two fixes: 

1) in the Programs & Features control panel, find the ISD Tablet entry and select it, choose "Change" at the top of the window and in the "Tablet Preference File Utility" that pops up, select "Remove" in either the "My Preferences" or "All User Preferences" sections. Wait for the window to close on its own and then you are golden.
or 
2) uninstall the Wacom driver completely through the Programs & Features control panel. Then reinstall the 7.1.2-9 driver and you are good to go
I followed the first set of steps last night and as of this morning, the pen jitters have not returned.
 
The only issue I have with the current drivers is perhaps due to their greater calibration accuracy. 
 
I like to use autohide on my desktop taskbar. In prior driver releases, hovering the pen at the bottom of the screen activates and unhides the taskbar. After running the calibration tool, it is impossible to dip the cursor below the screen, thereby making it impossible to unhide the taskbar. 
 
A simple workaround is to use a finger tip, But Bagdanoff suggested I tap just above the two bottom targets in the calibration tool. That worked but it also introduces a shift between the pen tip and cursor that increases as you work towards the bottom of the screen. 

Please let me know right away if you spot any other issues with the 7.1.2-9 pen drivers. It's encouraging to know that Wacom are working to keep the Surface Pro and penabled tablet community happy.

UPDATE October 13: Several other readers and Twitter followers have reported similar problems with these pen drivers.

Thanks to Sam Caraballo for providing the official US link to Wacom's legacy drivers here. Under the Tablet Model pulldown menu, select Tablet PC.

I've rolled my Surface Pro back to version 7.1.1-16, released in July and erratic pen behavior has not resurfaced.

Interestingly, after uninstalling the current set of drivers, I decided to test the default Windows 8.1 settings and found that Manga Studio works perfectly without the Wacom download. Unity 4.3b5, which has always had issues with recognizing the pen's input, worked better but not perfectly. Adobe Photoshop CC did not recognize pen pressure with the default drivers.

UPDATE October 12: Since installing these drivers on my Surface Pro (running Windows 8.1 RTM) I've been experiencing periodic issues. After an hour or so of inactivity, the cursor becomes jittery and erratic. Selecting a menu item becomes an adventure and some clicks are registered multiple times. Rebooting the Surface Pro corrects the problem.

One Twitter follower has confirmed the problem. Anyone else seeing this behavior? I've reached out to Wacom, but haven't gotten any response. 

My advice is to ignore this update until the issue is resolved or to at least make sure to have a backup of the older driver installers, as I can't seem to find them anywhere online. 

If you know where I can download the previous version, please put the link in the comments section below. 

* * * 

ORIGINAL POST October 7

In anticipation of Windows 8.1, Wacom has updated its enhanced tablet drivers for the Surface Pro and other penabled devices. The new driver release is version 7.1.2-9, dated October 7. 

Marketed as Wacom Feel IT technology, these drivers enable pressure sensitivity in Adobe Photoshop, Corel Painter and other graphics applications. 

According to the driver documentation, these items were fixed in 7.1.2-9 release: 

1. Improved calibration in some OEM tablets.
2. Memory leak with some tablets using pen.
3. Improved sleep and resume performance in some OEM tablets.

Wacom cautions that some OEMs are "releasing new tablet hardware that has not been tested with this driver." We certainly hope they're not referring to Microsoft and the new Surface Pro 2 due out later this month.

Installation on the Surface Pro running Windows 8.1 RTM went smoothly. After running the new calibration tool, I did encounter an issue with Sketchbook Pro 6.2. When I first ran the program, pen strokes were offset by at least an inch from the cursor. Fortunately, downloading and installing Sketchbook Pro 6.2.3 corrected the issue.

Download the Wacom Feel IT drivers here. 

I'll update this post if I encounter any other problems, but please let us know in the comments section below if you run into any trouble. 

Thanks to Twitter follower Joshua Drummond (@cakeburger) for the news tip! 


Posted
AuthorRick Rodriguez
Categoriesnews, Tips
15 CommentsPost a comment

NOTE: I stopped updating this post in October, 2013. However, much of what runs on the Surface Pro 2 should also work with the original Surface Pro. Applications that have had compatibility issues with display drivers such as Autodesk Mudbox will likely break if you attempt to update the SP1.

One of the principal objectives of this blog is to help take the guesswork out of making your purchasing decision. I'm taking the time to install and determine whether these creative applications run so you won't have to. 

Here's what I've installed and tested so far: 

Adobe


ArtRage 4 - runs, recommended

Autodesk 

  •  3DS Max 2014, 2013 - runs
  • Maya 2014, 2013  - runs
  • Maya LT 2014 - runs
  • Mudbox 2014, 2013  - incompatible, requires discrete graphics
  • Mudbox 2010 x64 - runs
  • Sketchbook Designer 2014, 2103  - runs, pressure sensitivity corrected with Wacom Feel driver update
  • Sketchbook Pro 6.2.3  - runs, recommended
  • Softimage 2014, 2013  - runs

Blender  2.68 - runs, not recommended: interface tool small, not scaleable, scaling reacts to pen movement

Celsys

  • Clip Studio Paint 1.2.7 - runs, recommended (Japanese language)
  • Clip Studio Modeler Beta 0.9.0 - runs (Japanese language)

Corel

  • Corel Draw x6 - runs
  • Corel Painter x3 -runs


Gimp 2.8.6 - runs 

Lumion Keyshot 4.1.35 - runs


Luxology/Foundry Modo 701601 SP5 - runs, set input device to tablet 

Maxon Cinema 4D Studio R14 - TBD

Newtek Lightwave 11.5 - runs, with pen control issues

Pilgway 3D-Coat 4.0.03 - runs  

Pixologic


61 Solutions Mischief 1.08 - runs

Smith Micro

  • Anime Studio Pro 9.5 - runs
  • Manga Studio 5, 5 EX - runs, recommended (update to 5.0.3)
  • Motion Artist 1.1 - runs
  • Poser Pro 2010 - runs


Speedy Painter 3.0.7 - runs

TeamUP (Lagoa) MultiOptics - runs, Chrome only

Toonboom Animate Pro 3 - runs

Trimble Sketchup 2013 - runs 

Triple Squid Software Design Moments of Inspiration 2.0 (Moi3D) - runs  

Unity Pro 4.3.0b5 - runs, touch response unreliable. Works with mouse, capacitive stylus.

Would you like me to test any other programs? Please leave a comment below.

I've always been a pc tweaker and tinkerer. I can't help myself. It's partly why I started this blog: to justify my obsessive hobby.

But the downside of constantly installing, testing and uninstalling so much software and hardware on a pc is that you're always on the verge of a serious conflict that jeopardizes the health of your entire system. 

Something occurred following my installation of Windows 8.1 last week that suddenly shut off most touch gestures. I could no longer swipe from any side but the left hand of the screen. Touch scrolling and picking worked, but I couldn't bring up the charms bar or drag a screen down to shutdown a program.

So for a couple of days this week my Surface Pro has been crippled and I had to resort to hovering with the pen around the edges of the screen to bring up the desired menu.

I even considered a system restore, but that is a last resort as it removes desktop applications.

Fortunately, the solution I found this morning is very simple and doesn't even require a reboot. If you ever find your touch gestures becoming wonky, try this solution first and you may save yourself much aggravation. 

In the desktop Control Panel, view by large or small icons. Tap the Tablet PC Settings. Under Display options, Reset calibration data.  

Your swipe gestures should now work properly. 

I'm not sure whether this is a Windows 8.1 bug or a conflict with the Wacom feel IT drivers, but after further testing I can confirm that creating a touch calibration setting with this control panel tool will adversely affect the touch gestures until you reset the calibration. In other words: forget the touch calibration option exists!

Posted
AuthorRick Rodriguez
CategoriesTips

Things have been a little slow on the Surface Pro and Windows tablet front the last couple of weeks, but that should all change beginning next week with the big reveal from Wacom, the eventual release of Samsung’s ATIV Q, Windows 8.1 and eventually the Surface 2.

In the meantime, I’ve been spending the last couple of weeks with my new favorite software Manga Studio 5, trying to learn the ins and outs of 3d modeling for it. Don’t judge me for focusing on 3d in a paint program, but I just naturally gravitate towards the least documented aspects of any software I use. All the digging and trial and error are just forms of procrastination to avoid real work.

Smith Micro is currently in talks with Manga Studio’s Japanese developers Celsys about whether to publish their new Clip Studio Modeler software as an English language companion product or add-on to Manga Studio. The software is currently available as a free beta from the Celsys site and a user has published a rudimentary English translation if you’d like to check it out for yourself.


Clip Studio Modeler beta - Coming soon to Manga Studio family?

Manga Studio Modeler, or whatever it ends up being called, will probably be the preferred method for creating or modifying 3d materials for future versions of MS, but in the meantime, I thought I’d focus on tools that I’m familiar with. [UPDATE: Although the fan-made translation leaves a lot to be desired, I've spent enough time with the 0.9 beta of CS Modeler to surmise that it is a very limited 3d app and will require a lot of polish before it can be used to model 3d characters.]

3D is a huge, complicated and frankly messy subject matter. Once you understand the basics and know where to find the features you need in a particular tool it’s not so bad. But the moment you need to move content from one application to another, you can be opening up a hornet’s nest.

I’m going to try to keep this series of posts as simple and generic as possible. I will point to some specific tools that I use, but you should be able to reproduce these steps with just about any 3d software. Each tool has its strengths and weaknesses, but it all generally comes down to personal preference and budget.

The 3D Canvas

Some of this will sound like math and I’m very sorry for those of you whose minds turn to mush at the very thought of math.

With a paint program like Manga Studio, you’re accustomed to working on a two-dimensional plane that can be described by a horizontal (x) dimension and a vertical (y) dimension.

3D adds a perpendicular plane that defines the vertical (y) and depth (z). In the image below, the ground plane is lying on the x (horizontal) and z (depth) plane.


Visualizing the 3d workplane

In the image above, the cube mesh is defined by 8 points or vertices. (Only 7 locations are visible in this image. The last vertex is hidden by the front facing surfaces.)

Each side of the cube is composed of one quadrangular polygon or face. Each quad is defined by four vertices. The quad polygon can be subdivided into two triangles. Each vertex can be identified by its x, y and z coordinate.

Object Types

There are two types of 3d materials or objects to consider: static or articulated meshes.

As its name indicates, a static mesh doesn’t have any moving parts and is probably what you will import most often.  Examples of static meshes are props, scenery and backdrops, like a pencil, a desk or a classroom. Articulated meshes, such as the 3d characters included in Manga Studio, have moving parts that you can pose.

File Formats - OBJ

Every 3d software writes its own file format, but a couple of these formats have been around long enough to become “universal.” The most common of these is OBJ. Because this format goes all the way back to the dawn of computer animation, it is the most basic.

OBJ models contain no animation information and are always static.

An OBJ file is simply an ASCII text file that lists the x, y and z coordinates of every vertex (v) in a mesh.

Here’s the first few lines of an OBJ file for the cube mesh:

# XSI Wavefront OBJ Export v3.0
# File Created: Sat Aug 17 04:17:07 2013
# XSI Version: 12.1.99.0
mtllib cube.mtl
o cube
# Hierarchy (from self to top father)
g cube
#begin 8 vertices
v 0.000000 0.000000 0.000000
v 1.000000 0.000000 0.000000
v 0.000000 1.000000 0.000000
v 1.000000 1.000000 0.000000
v 0.000000 0.000000 1.000000
v 1.000000 0.000000 1.000000
v 0.000000 1.000000 1.000000
v 1.000000 1.000000 1.000000
#end 8 vertices

You’re not going to need to edit an OBJ file except to determine the name of its material library. In the cube example above, the mtlib associated with the mesh is called cube.mtl.  Manga Studio will allow you drag an OBJ file directly onto its canvas, but without an accompanying MTL file, the mesh will render as a solid gray with no textures.

Unfortunately, while there are many thousands of free OBJ files available for you to download online, they often don’t have an MTL file. For these files, the only way to apply materials is to load them into a 3d program, add color and textures and re-export them with a new MTL file.

The MTL file

The MTL for a given object is also a simple ASCII text file. Here is the cube.mtl referenced in the cube.obj file:

newmtl scene_material
Ka 0.300000 0.300000 0.300000
Kd 0.700000 0.700000 0.700000
Ks 1.000000 1.000000 1.000000
Ns 50.000000
Tr 0.000000
illum 2

Newmtl defines the name of the material applied in the 3d application. In the above example, it’s Softimage’s default scene_material.

newmtl material
Ka 0.257000 0.000000 0.000000
Kd 0.698000 0.000000 0.000000
Ks 1.000000 1.000000 1.000000
Ns 50.000000
Tr 0.000000
illum 2

In this example, the scene_material has been replaced by material.

newmtl red
Ka 0.257000 0.000000 0.000000
Kd 0.698000 0.000000 0.000000
Ks 1.000000 1.000000 1.000000
Ns 50.000000
Tr 0.000000
illum 2
newmtl Polygon_XSIPOLYCLS.map
Ka 0.300000 0.300000 0.300000
Kd 0.700000 0.700000 0.700000
Ks 1.000000 1.000000 1.000000
Ns 50.000000
Tr 0.000000
illum 2
map_Kd BlueGrid.png

This example has two materials: one named “red” and another named “map,” which is applied to one sub-group, or cluster of the cube (Polygon_XSIPOLYCLS). The most important entry to note here is the map_Kd item, which identifies the name and location of the texture required by the map material.

When you download an OBJ and MTL, you will also need to download or recreate any image texture files referred to in the object’s material library.

Texture files must be zipped in the same folder as obj and mtl files. Make sure that mtl is edited to reflect this path for textures.

When importing into Manga Studio, the obj, mtl and textures should all be zipped in the same directory. You will need to edit your MTL with a text editor to reflect this. In other words, if the map_Kd entry above read textures/BlueGrid.png, you would need to remove the reference to the textures folder.

The diffuse texture is an image file that determines the color of faces to which it is applied. If the diffuse texture referred to in an MTL file is missing, the corresponding faces that use that material will render grey.

Manga Studio doesn’t understand any references to specular, bump or other common textures. Make sure to edit those out of the MTL file or your object won’t render properly.

So now that you know a little about OBJs and the way Manga Studio interprets their materials, you should be able to import any static mesh you create or find online, using the process I wrote about here and that MS artist and trainer extraordinaire Doug Hill demonstrated in his video here.

File formats – FBX

FBX, short for Filmbox, was a format created for the importation of 3d objects for motion capture. Filmbox was purchased by Autodesk who market the product as Motion Builder. The FBX format is constantly being updated and has become the de facto standard for sharing data between 3d applications and game engines.

The problem with FBX is that it is managed by Autodesk and is not an entirely open standard. Developers (including some within the Autodesk family) are always having to play catch-up with semi-annual releases that often break the previous version.

FBX can be such a hassle that sometimes a file that plays perfectly in one application will look badly mangled or worse refuse to load altogether in another. As an example, when I first started writing this post, I thought I would use the free DAZ Studio 4.6 to demonstrate the creation of FBX files, but the files it currently generates are not compatible with the recently released Autodesk FBX Review, which I discussed here.

I'm not saying that FBX is totally broken. Depending on the source, it does work, and Manga Studio understands it, but I’ll save that for another article once I’ve found a reliable pipeline that is also affordable.

Rigging and Skinning an OBJ

If you’re modeling your own character to pose, it may take some effort, but every 3d application will eventually generate a flavor of FBX that Manga Studio will be able to read.  If you’re not a modeler or can’t invest the time to build a character from scratch, you’re not entirely out of luck.

There are many free and paid sources of 3d models online, including Turbo Squid, TF3DM, Creative Crash, and many others. This site has a nice list of over 60 such destinations. http://www.hongkiat.com/blog/60-excellent-free-3d-model-websites/.

Whether a mesh is available for free or paid, there Is no guarantee that it will work without some intervention on your part. Quality varies widely and products produced over the years may no longer be 100% compatible with current tools. In the example screenshots below, I used a Spider-Man mesh that I found on TF3DM, but it was composed of several different objects that I needed to combine. It also had specular and bump maps that I discarded. Had I kept them in the file, the mesh would render as grayscale.

Assuming you have found an OBJ you like, cleaned up its MTL file and accompanying textures and gotten it to load correctly in Manga Studio, the next step is to make it poseable.

To do this in a 3d application, you create or bring in a pre-made skeleton (rig) and attach or skin it to your mesh. Every software does this differently, so you will need to research this on your own.

For those of you who don’t own a 3d app or want a shortcut, there is a free (until September) option. Mixamo is a service designed for game artists who want to quickly apply motion captured animations to their game characters. In addition to working with already rigged meshes, Mixamo also features an amazing auto rigger that works great and is absolutely free to use for the next few weeks with meshes under 10,000 polygons. 

If your OBJ, MTL and textures have loaded correctly, you'll see your textured object here.

After you create an account, upload your zipped OBJ, MTL and textures to the auto rigger.


Markers assigned with symmetry on.

You will then assign markers to define the object’s chin, wrists, elbows, knees and groin. Mixamo automagically will do the rest. 

To test the results, you can see your mesh performing various animations, including an all-important rigging stress test. Above is a screengrab of the rigged Spider-Man mesh performing a standard run. If you’re happy with the results, you can download the resulting FBX file for free.


The Mixamo FBX output loaded and posed in Manga Studio 5

Simply zip up your Mixamo FBX file and its corresponding textures and drag this archive onto Manga Studio and you now have a working poseable character.

Mixamo is a great service and is obviously a huge timesaver for professional game artists. Unfortunately, it’s All-Access annual plan is quite expensive for only occasional use. I recommend taking advantage of the remaining weeks of free availability and I will research any other low cost alternatives I can find. If you know of any, please leave a comment in the section below.

One obvious alternative is the free and open-sourced Blender. This is a very robust application that should be able to handle the entire 3d modeling, texturing, rigging, skinning and exporting process for you. However, it can be quite daunting to learn and I've never taken the time to use it. If any of you are Blender users and would like to contribute a post or video, I and the entire Manga Studio community will thank you.

* * * 

So there you have it: more than you probably ever wanted to know about 3d, OBJ and MTL and a simple, free (for a limited time) way to get poseable 3d characters in your Manga Studio projects.  I'd like to do more of these types of posts in the future, but I'd really appreciate your feedback on how basic or technical to make them. I look forward to reading your reactions and seeing how you apply these 3d assets in your upcoming Manga Studio projects. 


Note: I haven’t been able to get Unity 4.x working on the Surface Pro and Softimage is pretty difficult to operate without a middle mouse button, but I thought readers of this blog wouldn’t mind this off topic tutorial for a change of pace. The accompanying video is a little tough to watch at 7 minutes without audio. It's difficult to line up so many images with body copy in Squarespace 6, so I hope the slideshow will help. Apologies for the low resolution.

I’m a long time Softimage and Unity user, but I mostly create static meshes for environments and the like. Because I only have to export an animated character every couple of years or so, it seems I have to relearn the process every time I do it. And since Unity 4.x’s introduction of the Mecanim character animation technology, I really had some catching up to do.

Unfortunately, while Unity is quickly becoming the world’s most popular game engine, Softimage appears to be moving on a different, diminishing trajectory. Despite its amazing capabilities, Softimage, forever known as XSI to its long-time users, is probably the least documented major 3d application, especially when it comes to integrating with Unity.

So the purpose of this brief document is as much for me as it is for you, dear reader. I just wanted to have a simple walkthrough of the XSI to Unity Mecanim workflow to jog my memory the next time I need to use it.

There won’t be anything fancy contained here and there are many subtleties I will skip to get to the meat of the process. Depending on the response to this document, I may expand on those steps in the future.

For now we’re going to work with Softimage’s built-in low poly primitive man and basic skeleton.

Make sure the Animate toolbar is visible along the left side of the screen. Pressing 2 on your keyboard will switch to Animate mode.


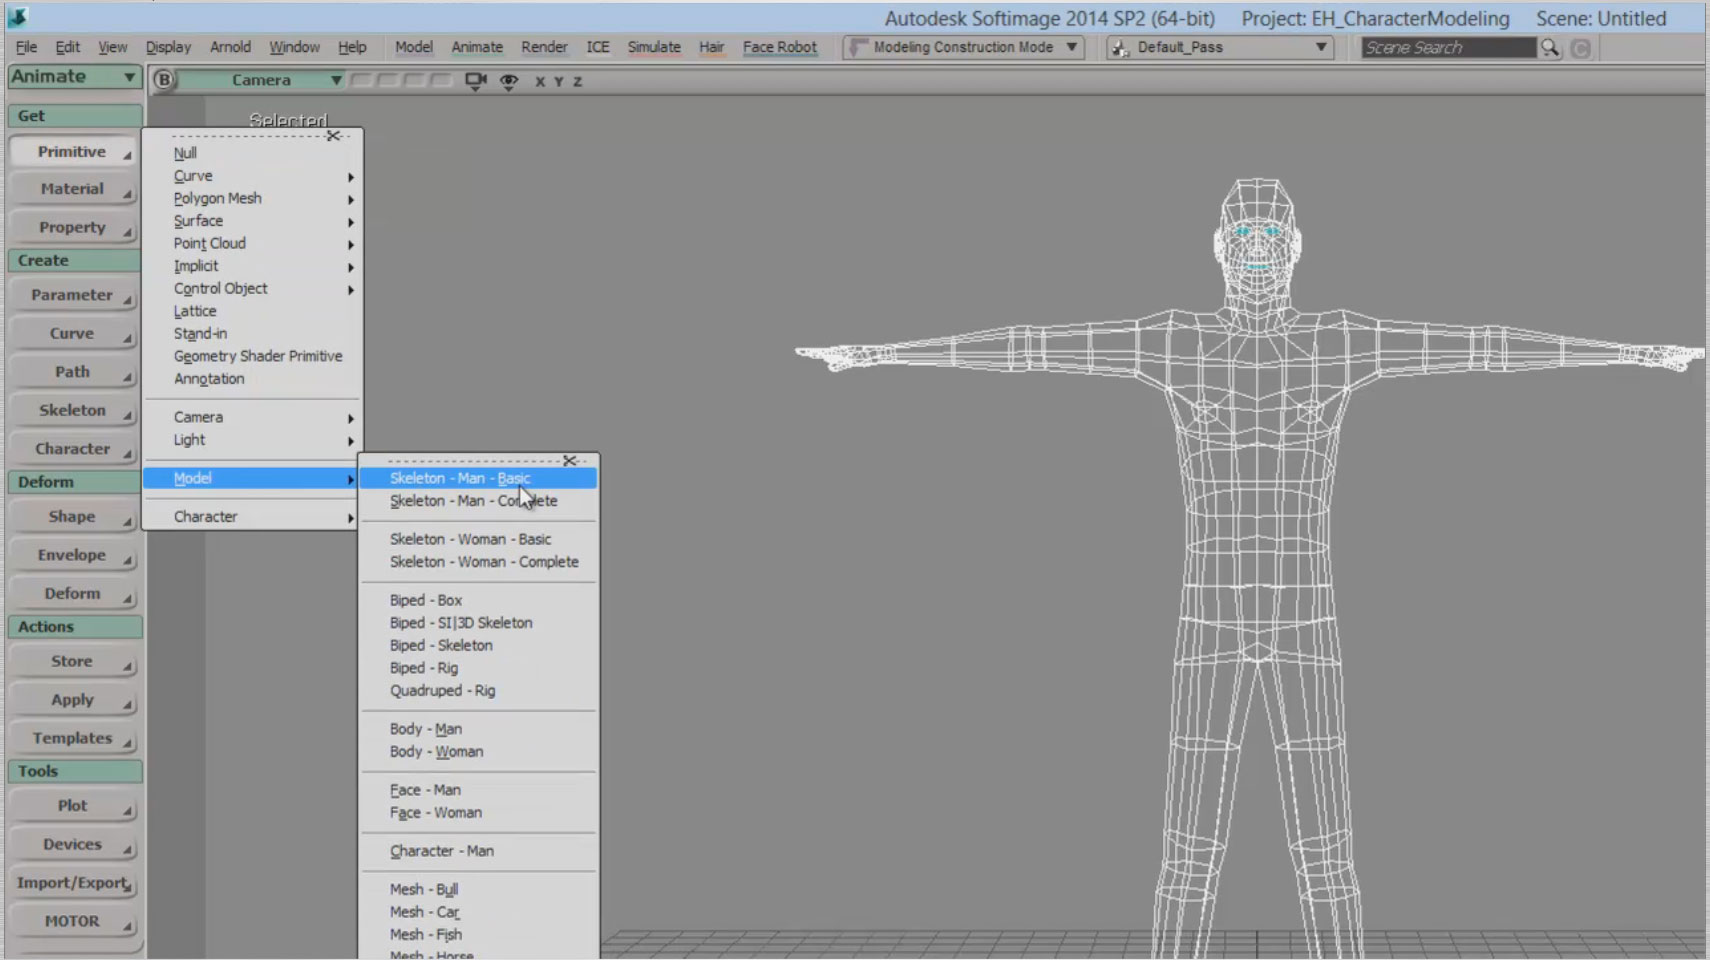
Load the primitive man object by going to the Animate toolbar’s Get/Primitive/Model /Body Man item.

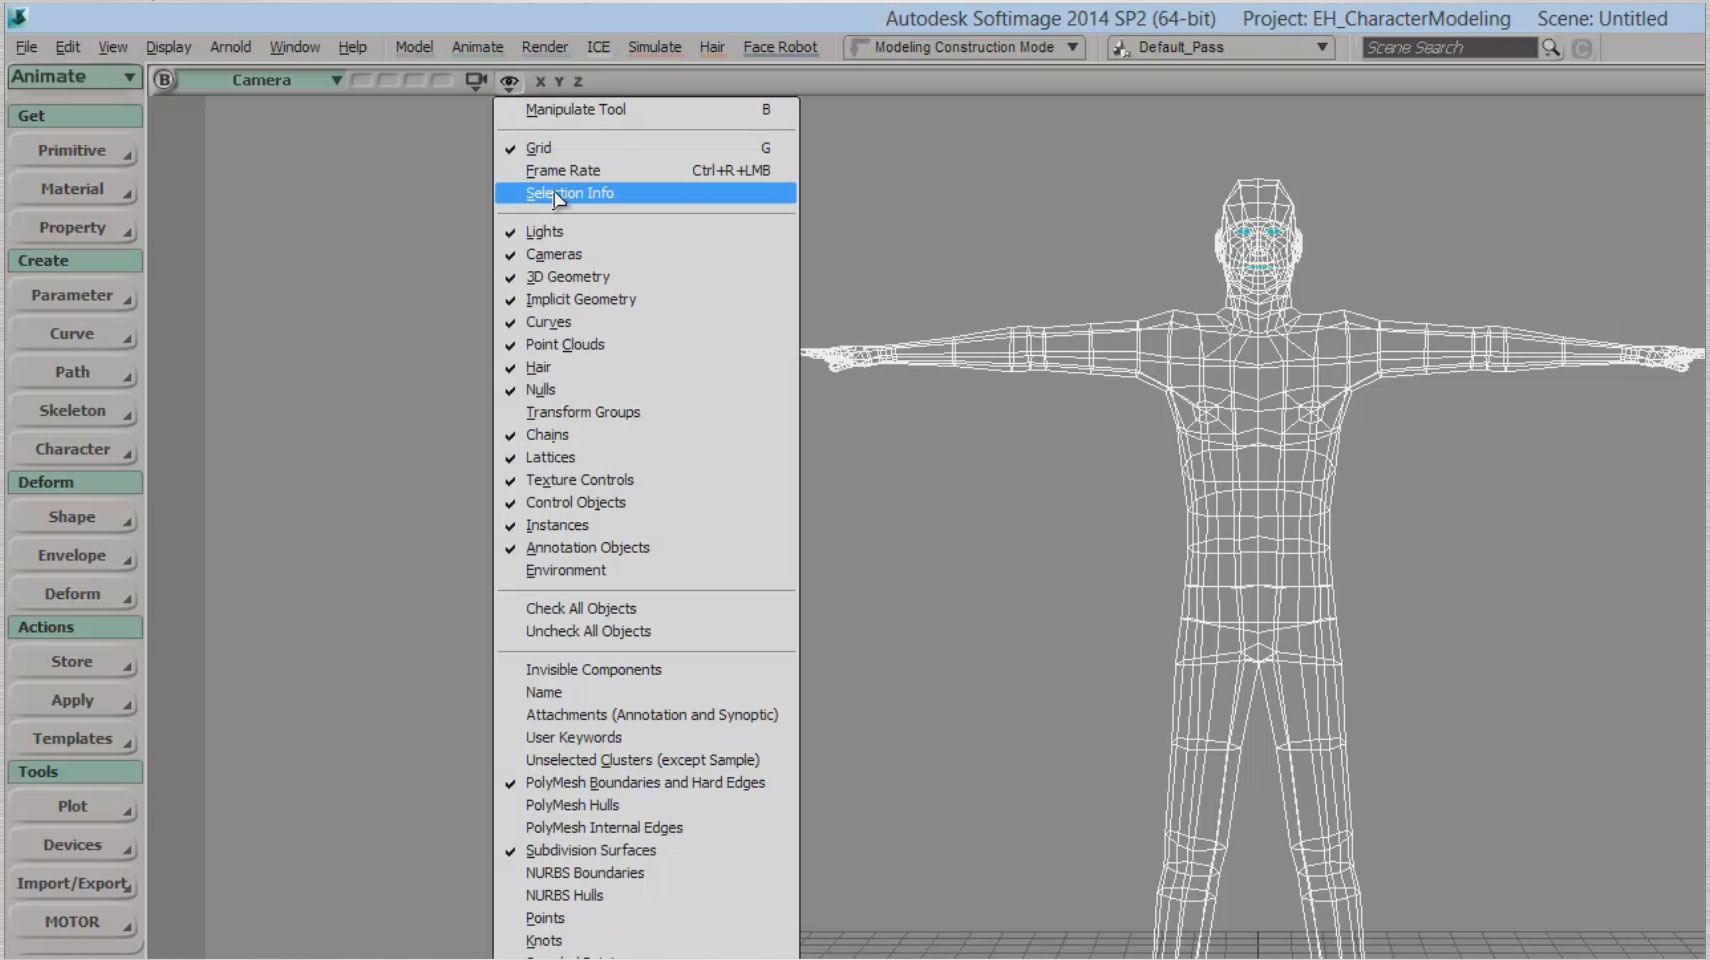
Press the “a” key to frame up the primitive man model. Notice that this is a very low polygon model, but it will do just fine for our demonstration. To view scene statistics, select the Eye icon at the top of the scene view and pull down and select “Selection Info.”

Then click on the man primitive to select it and you will see that it is composed of only 2356 triangles.

Next we're going to add a skeleton to the scene that we will use to deform our model. From the Animate toolbar, selet Get/Primitive/Model/Skeleton Man Basic. You'll notice that the skeleton lines up perfectly with our primitive.

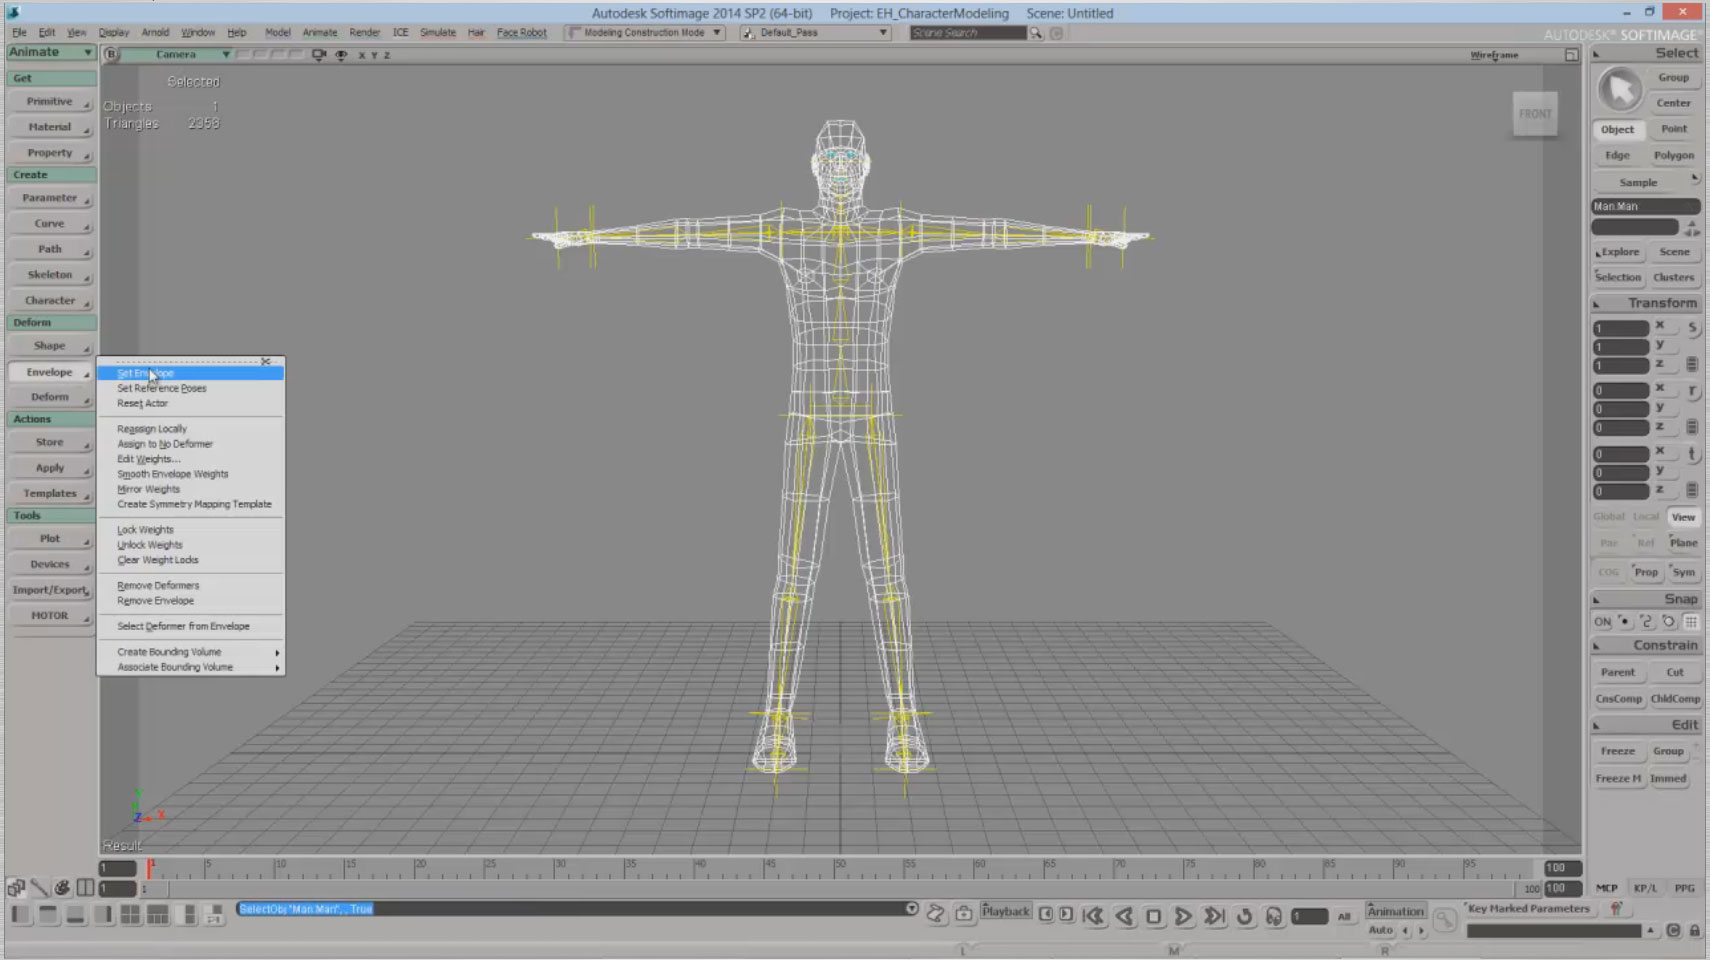
Next we need to envelope (or skin) our model to determine which parts of the mesh are controlled by particular bones. Select the man primitive, then go to the Animate toolbar and select Deform/Envelope/Set Envelope.

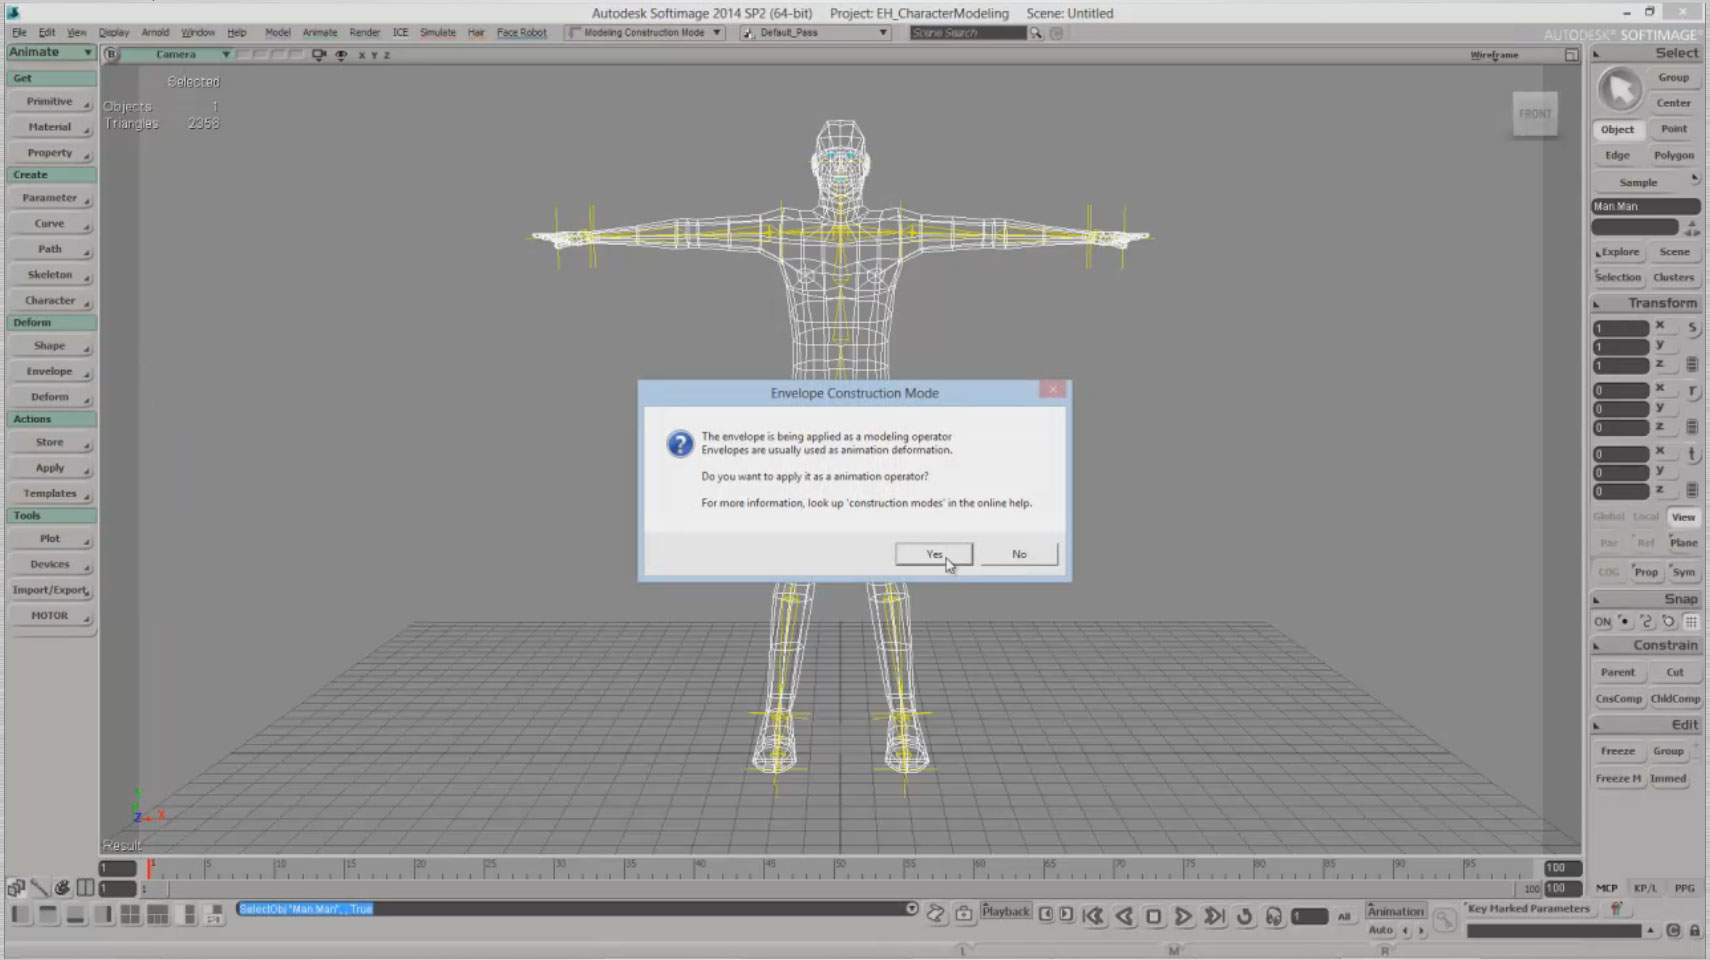
Softimage will display a warning message that says essentially that this operator must be applied in animation mode. Select Yes and the software will do so automatically.

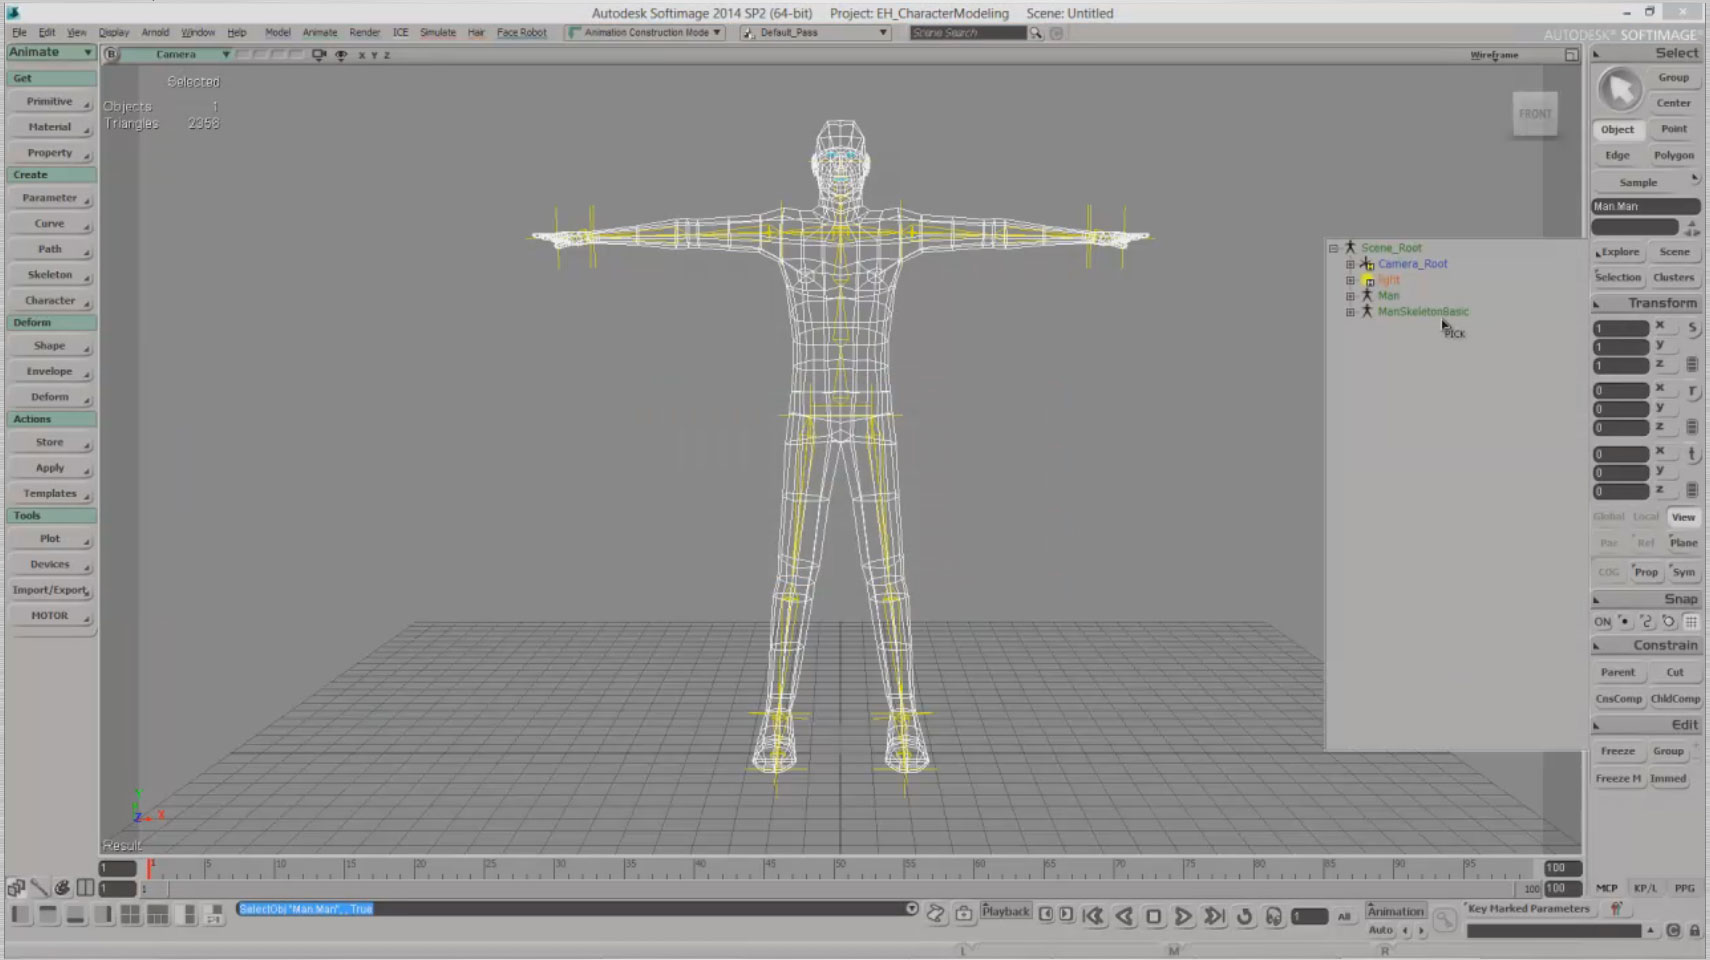
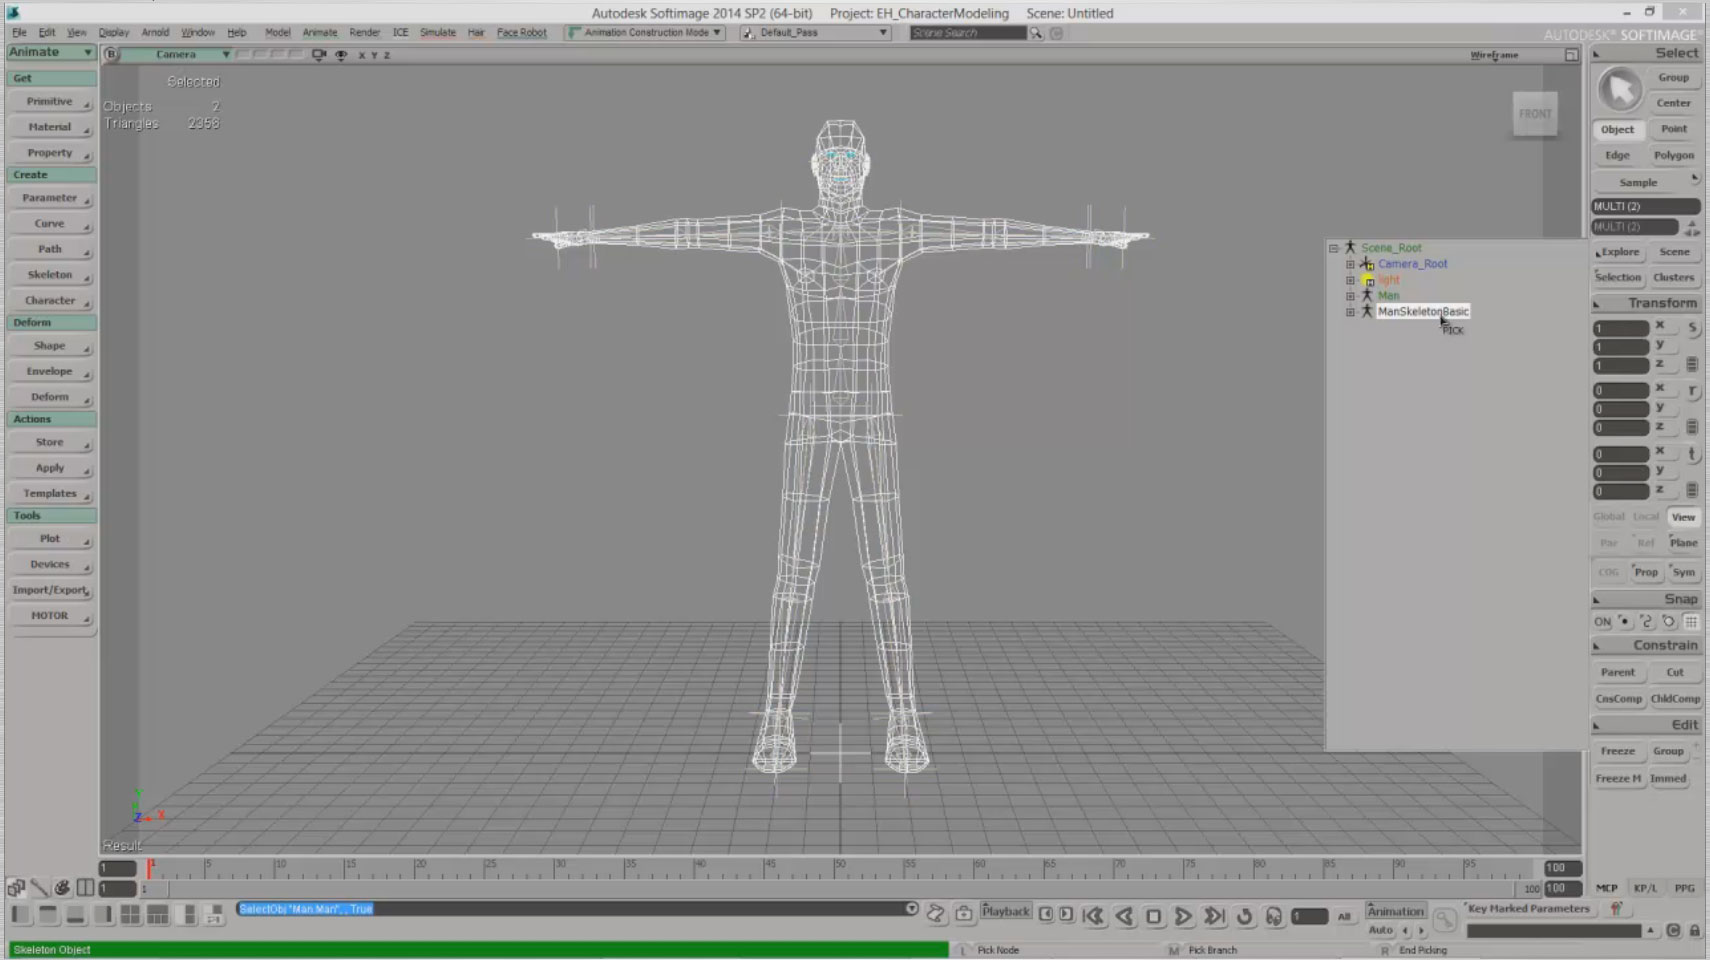
Now we need to select all of the bone objects that will be considered in the weight map envelope. You can pick one bone at a time to envelope, but the simplest way to do this is to go to the Scene Explorer located in the Main Command Panel on the right of the screen or by pressing 8 on your keyboard. In the Scene Explorer, middle click your mouse button on the man skeleton basic object to select the entire hierarchy.

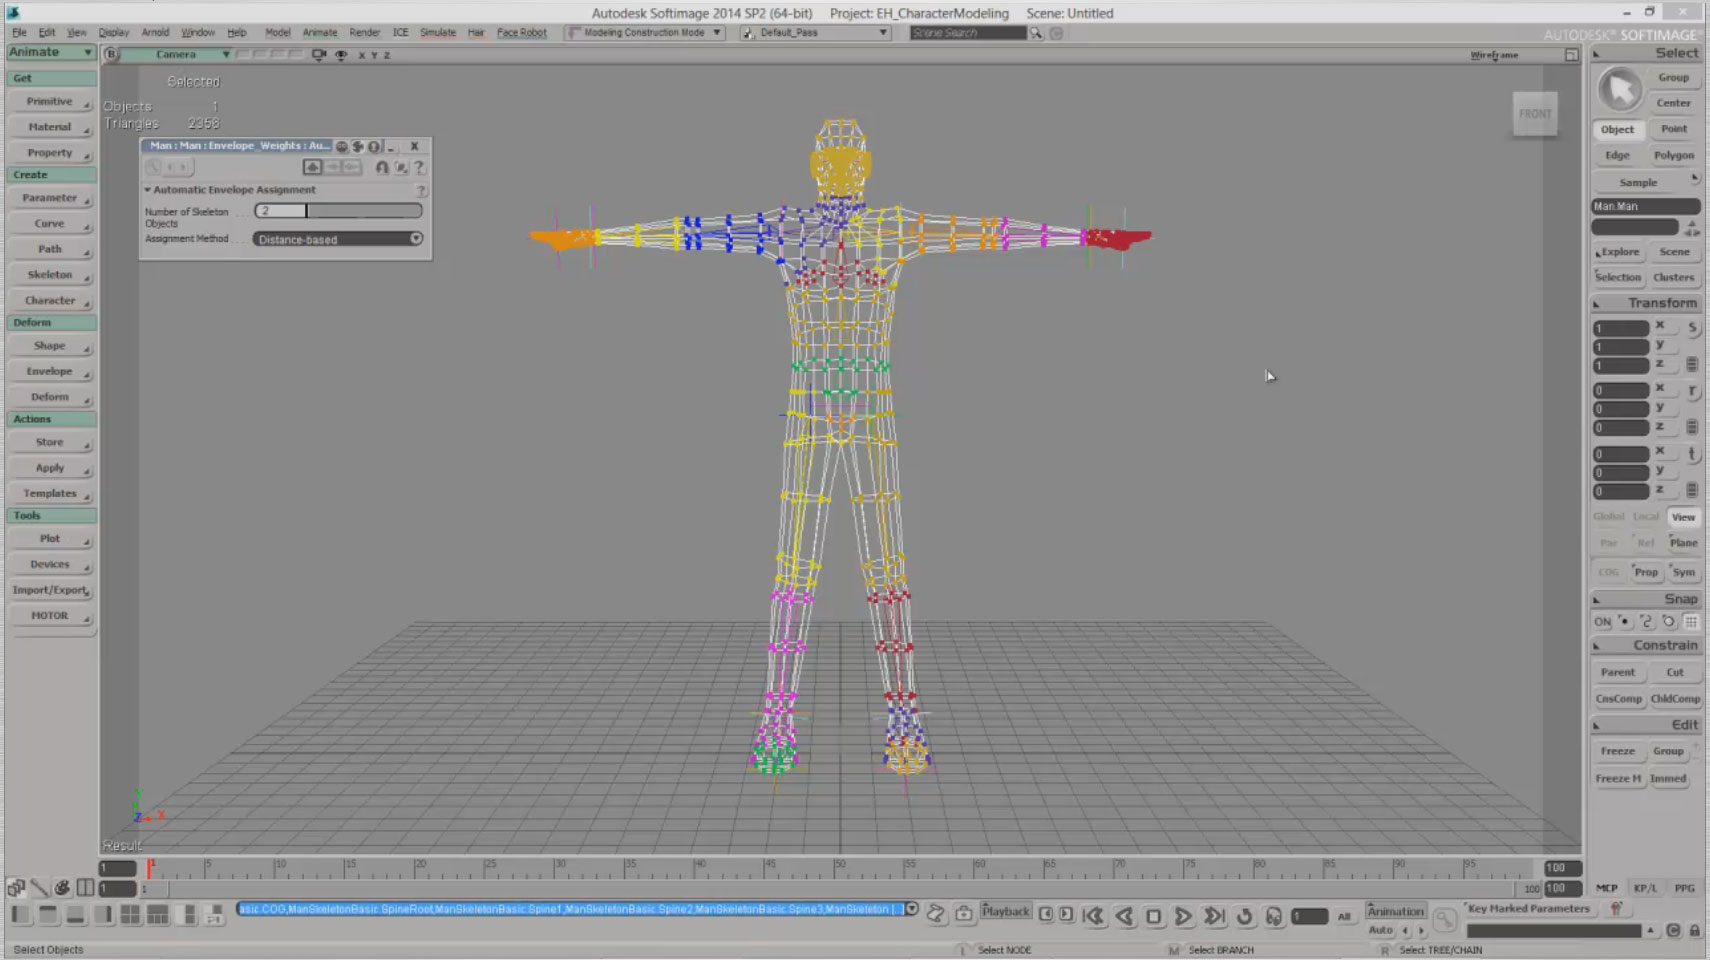
Close the scene explorer window and then right-click to end the picking session. Accept the defaults in the Automatic Envelope Assignment window and you are done.

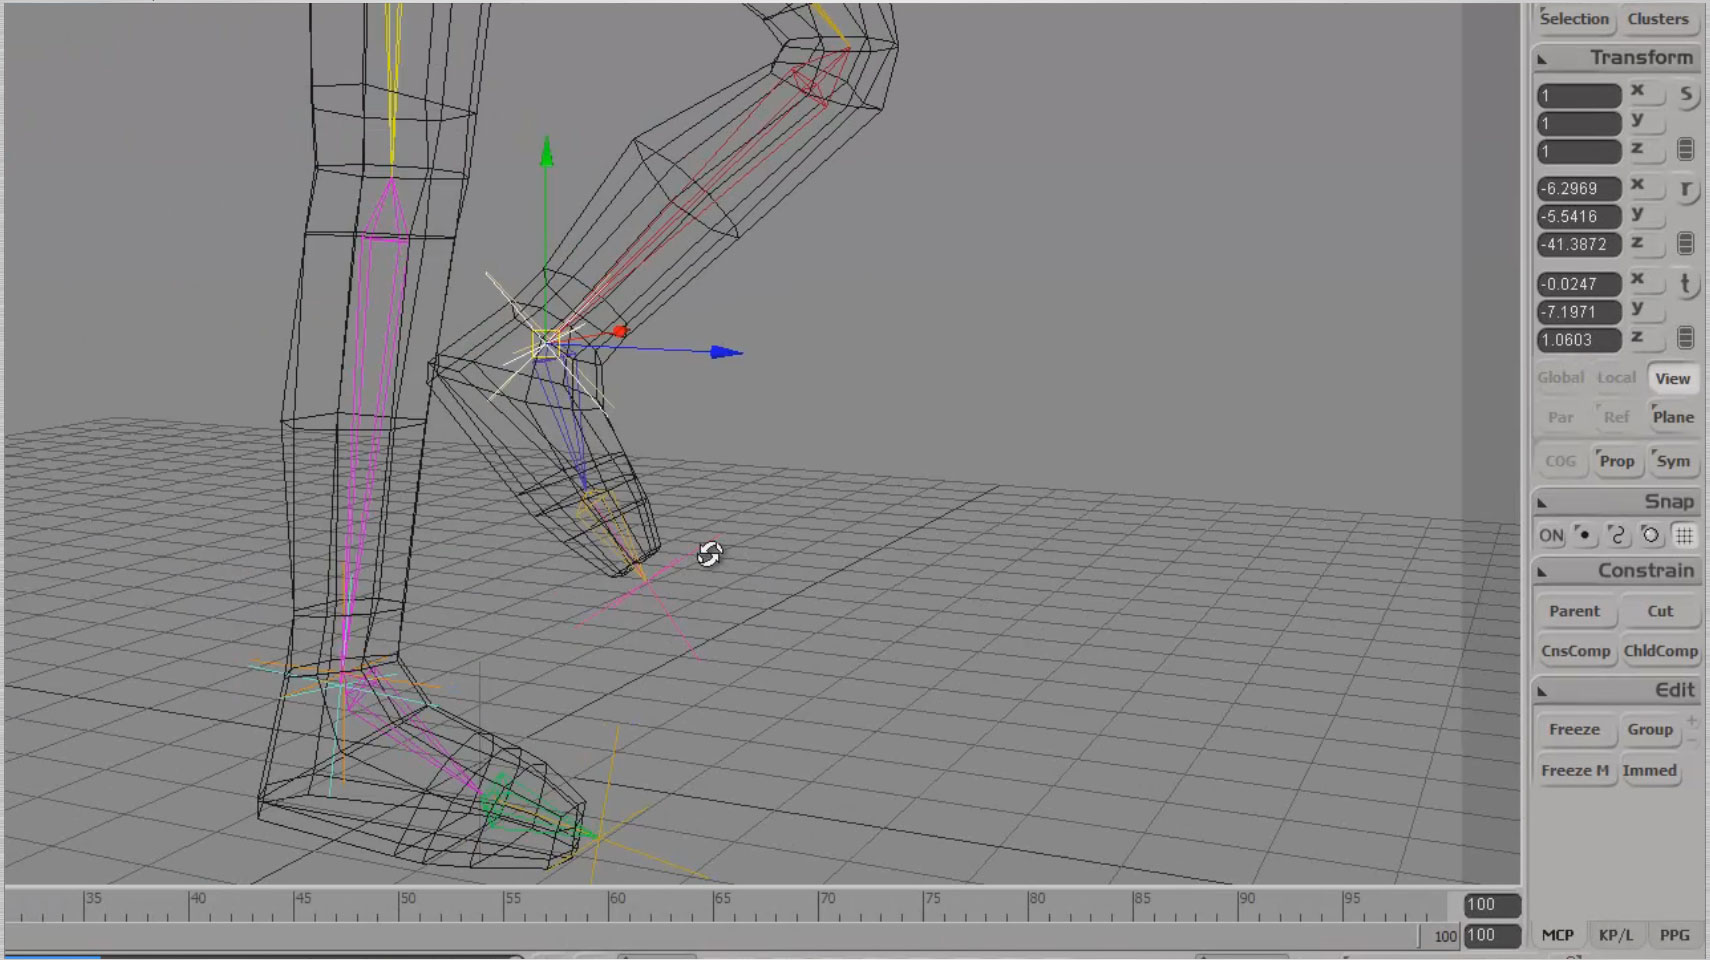
Test your envelope by selecting the left or right foot effector (one of the two null objects sitting in the area of the mesh’s ankles), hitting the key the v key to bring up your translate manipulator and click and drag along the green or Y axis to lift the effector and see whether the leg flexes properly. Undo or ctrl-Z to return the effector to its original location.

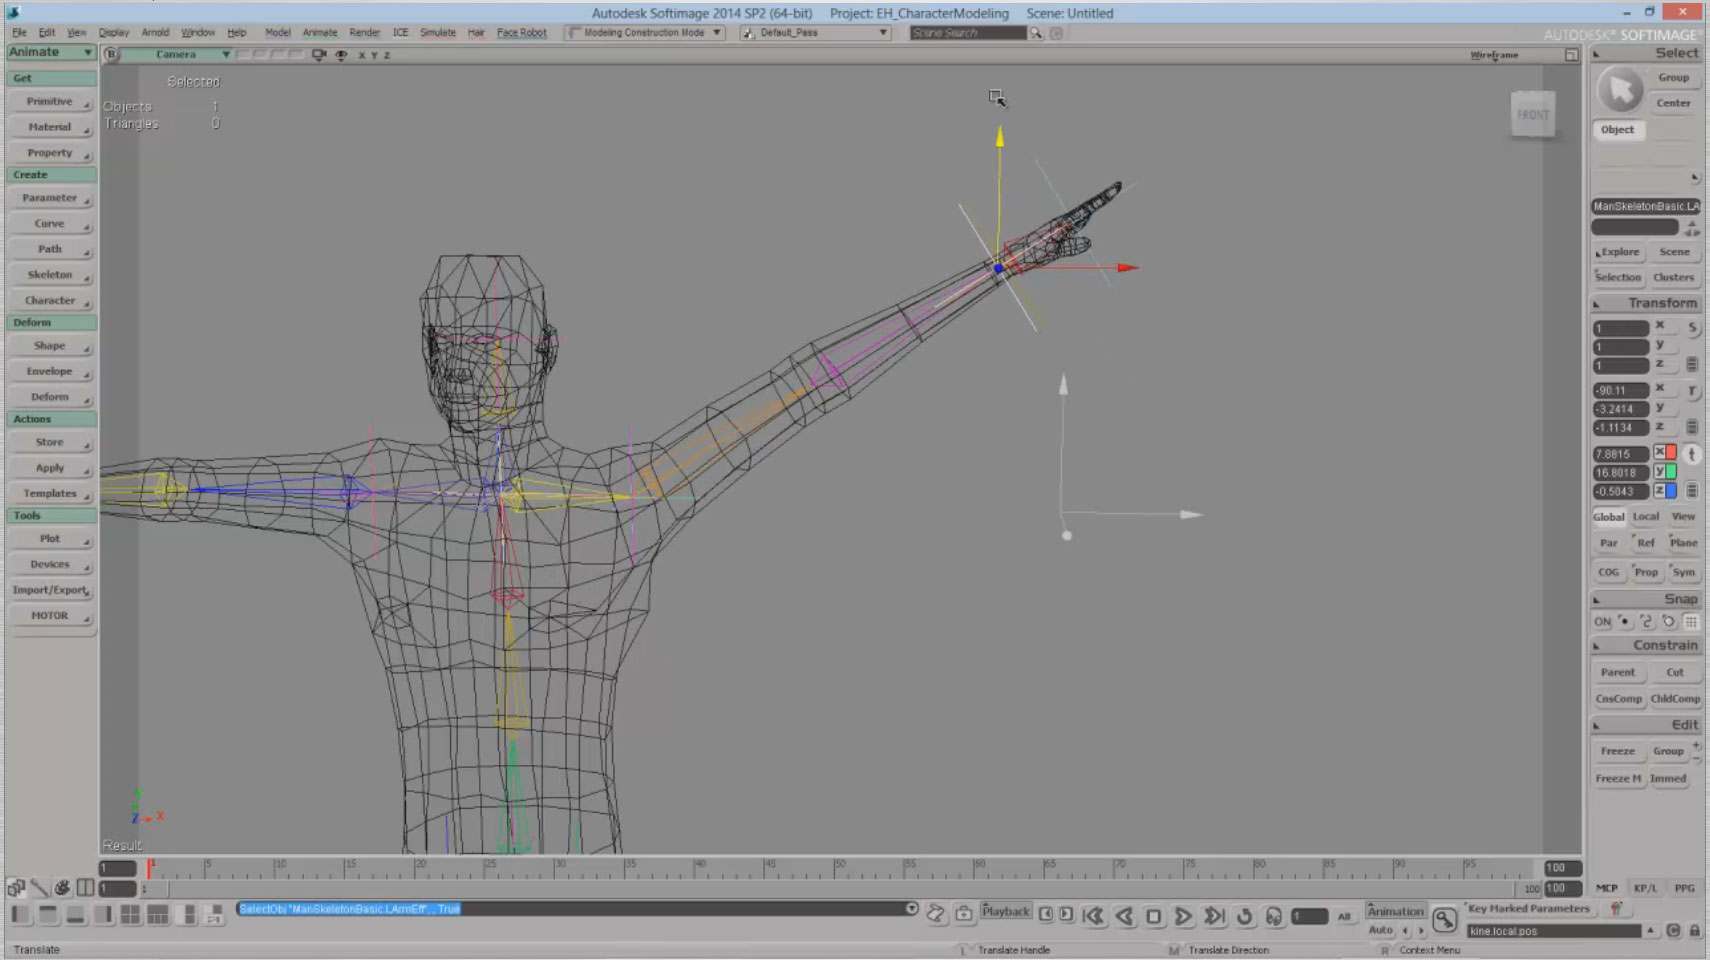
Test again by selecting the left or right arm effector (one of the two nulls located at the mesh’s wrist) to see the bending of the arm. You will notice some unwanted pinching and stretching under the armpit. We won’t attempt to correct this in this tutorial. (For a finished product, you would want to go in and change the weight map values in the problematic areas.) Press cntl-Z to return the arm effector to its original position.

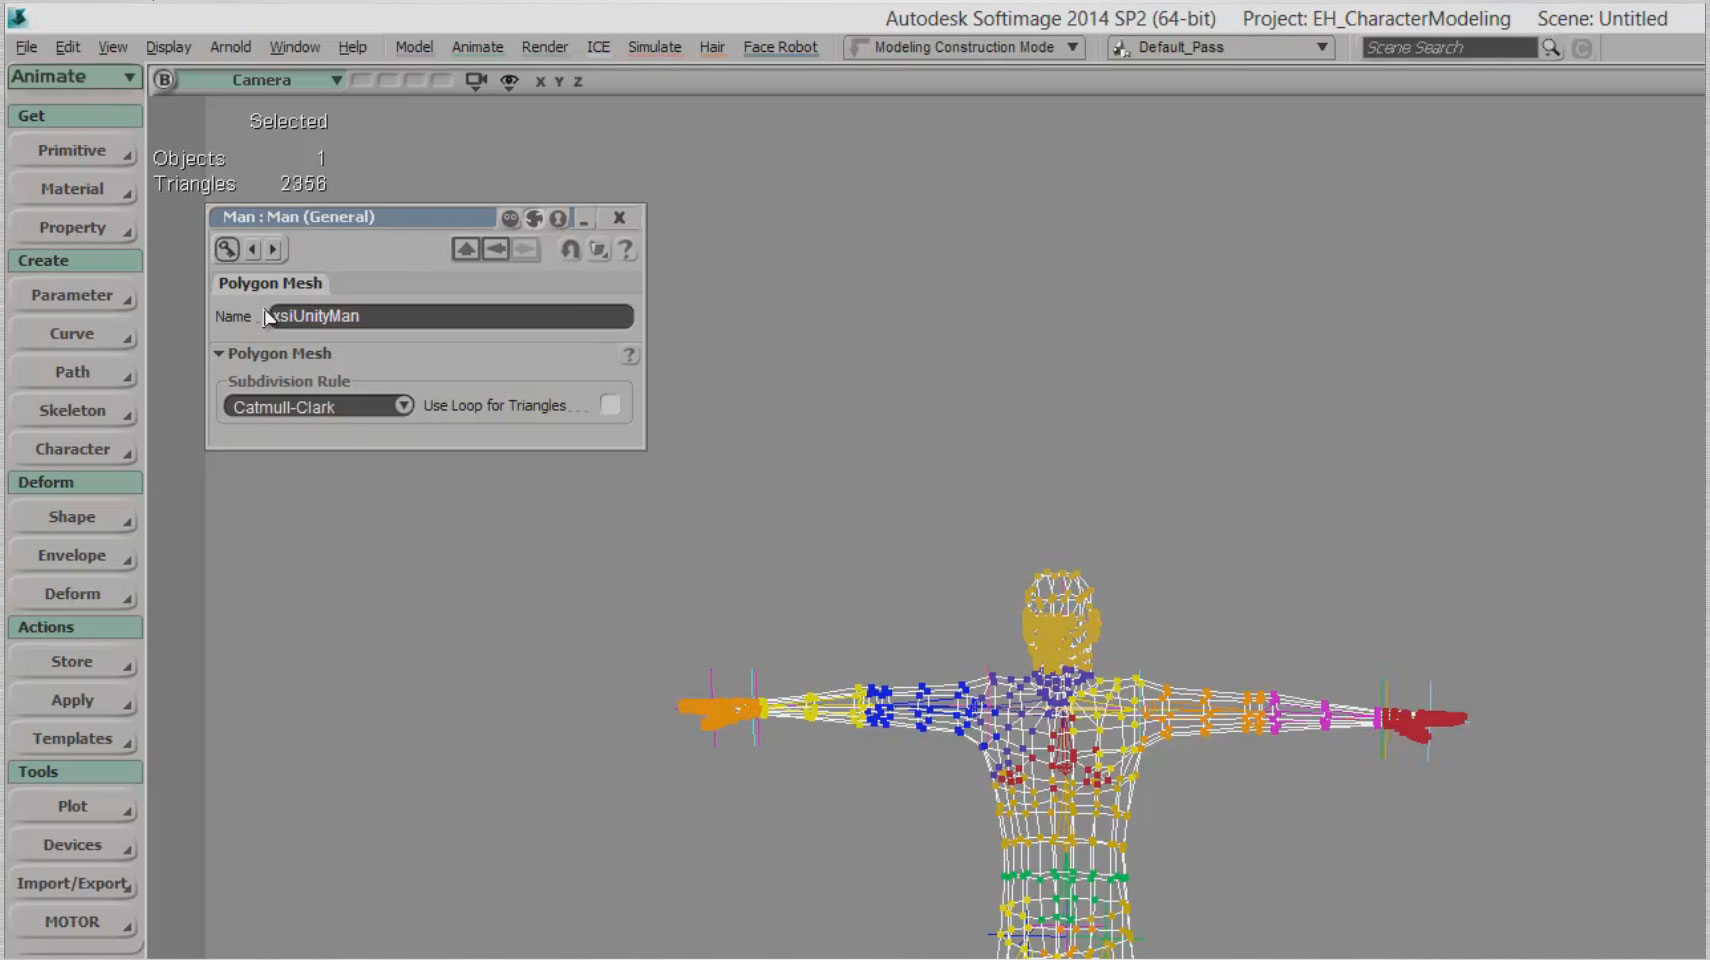
Now we want to export our enveloped (skinned) character to Unity. First, let’s rename the man

primitive. With his mesh selected, hit Enter. Type xsiUnityMan.

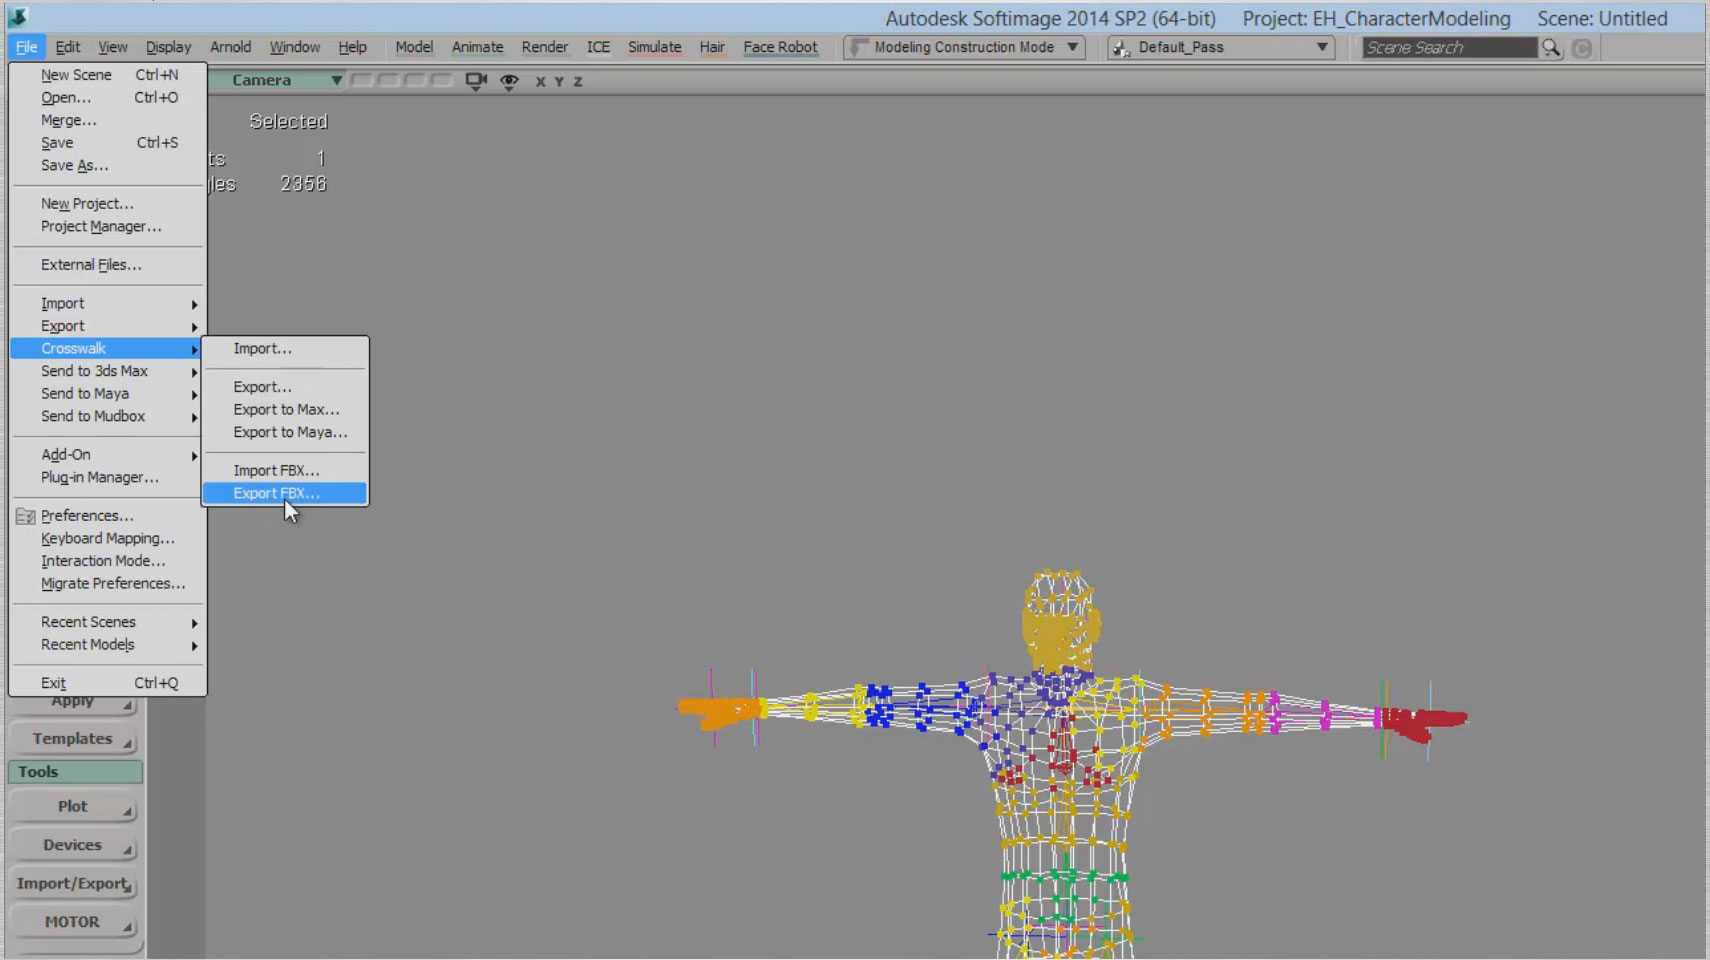
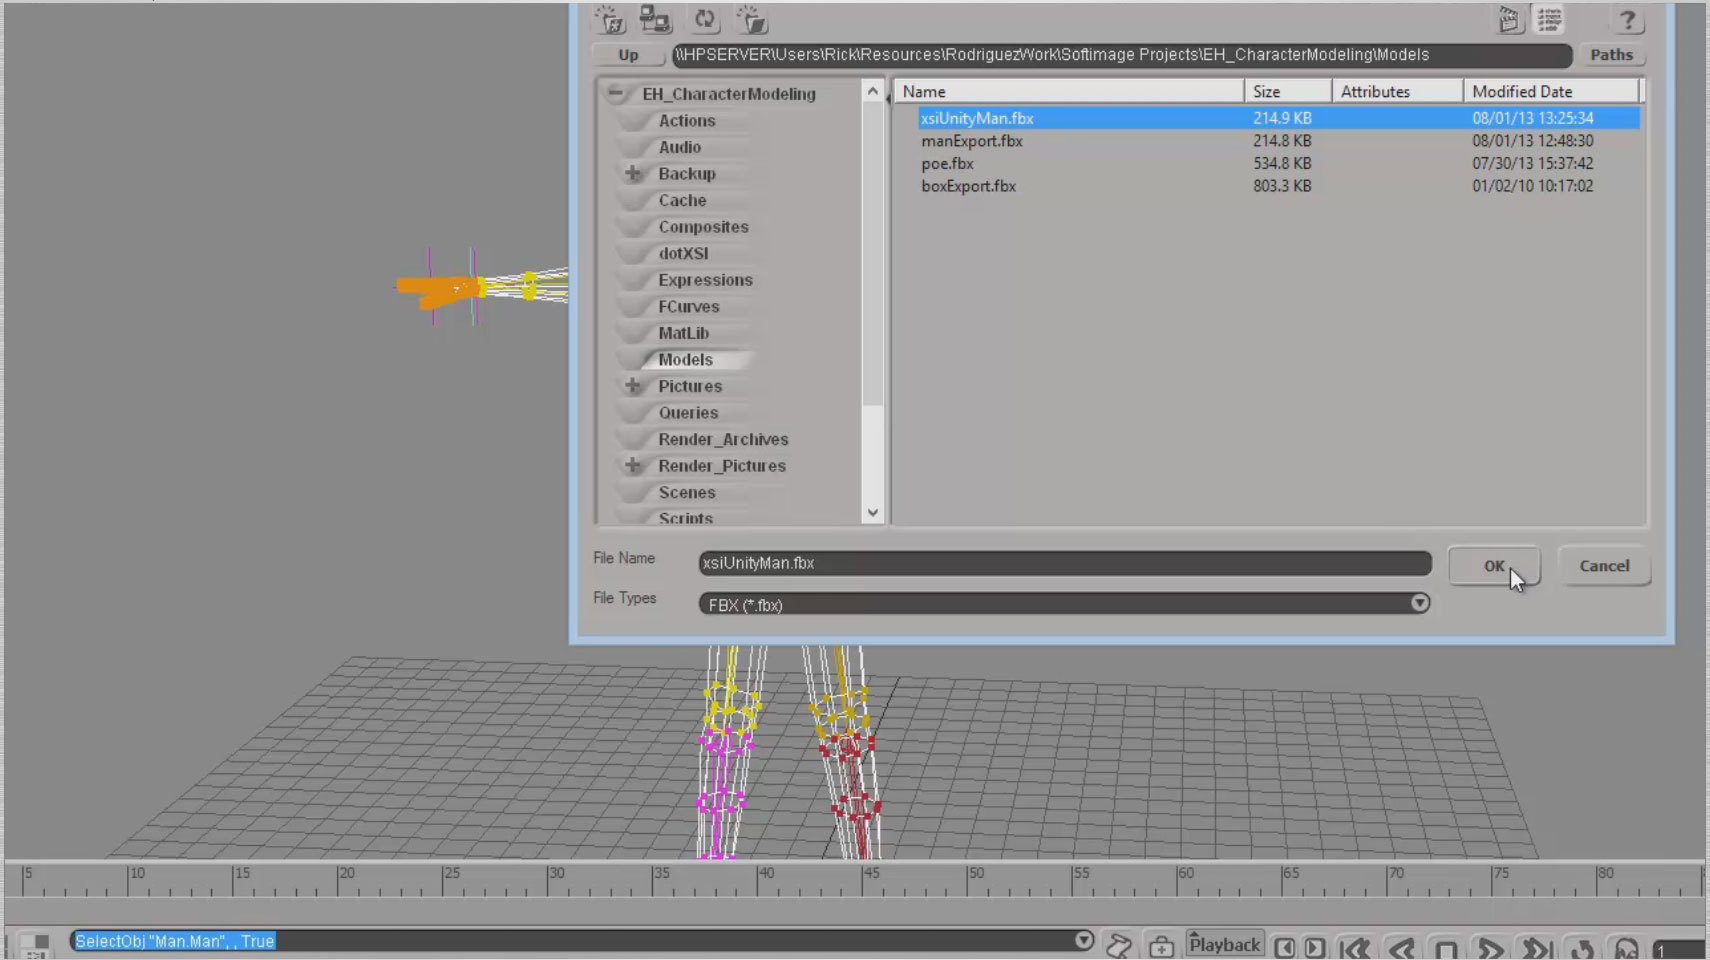
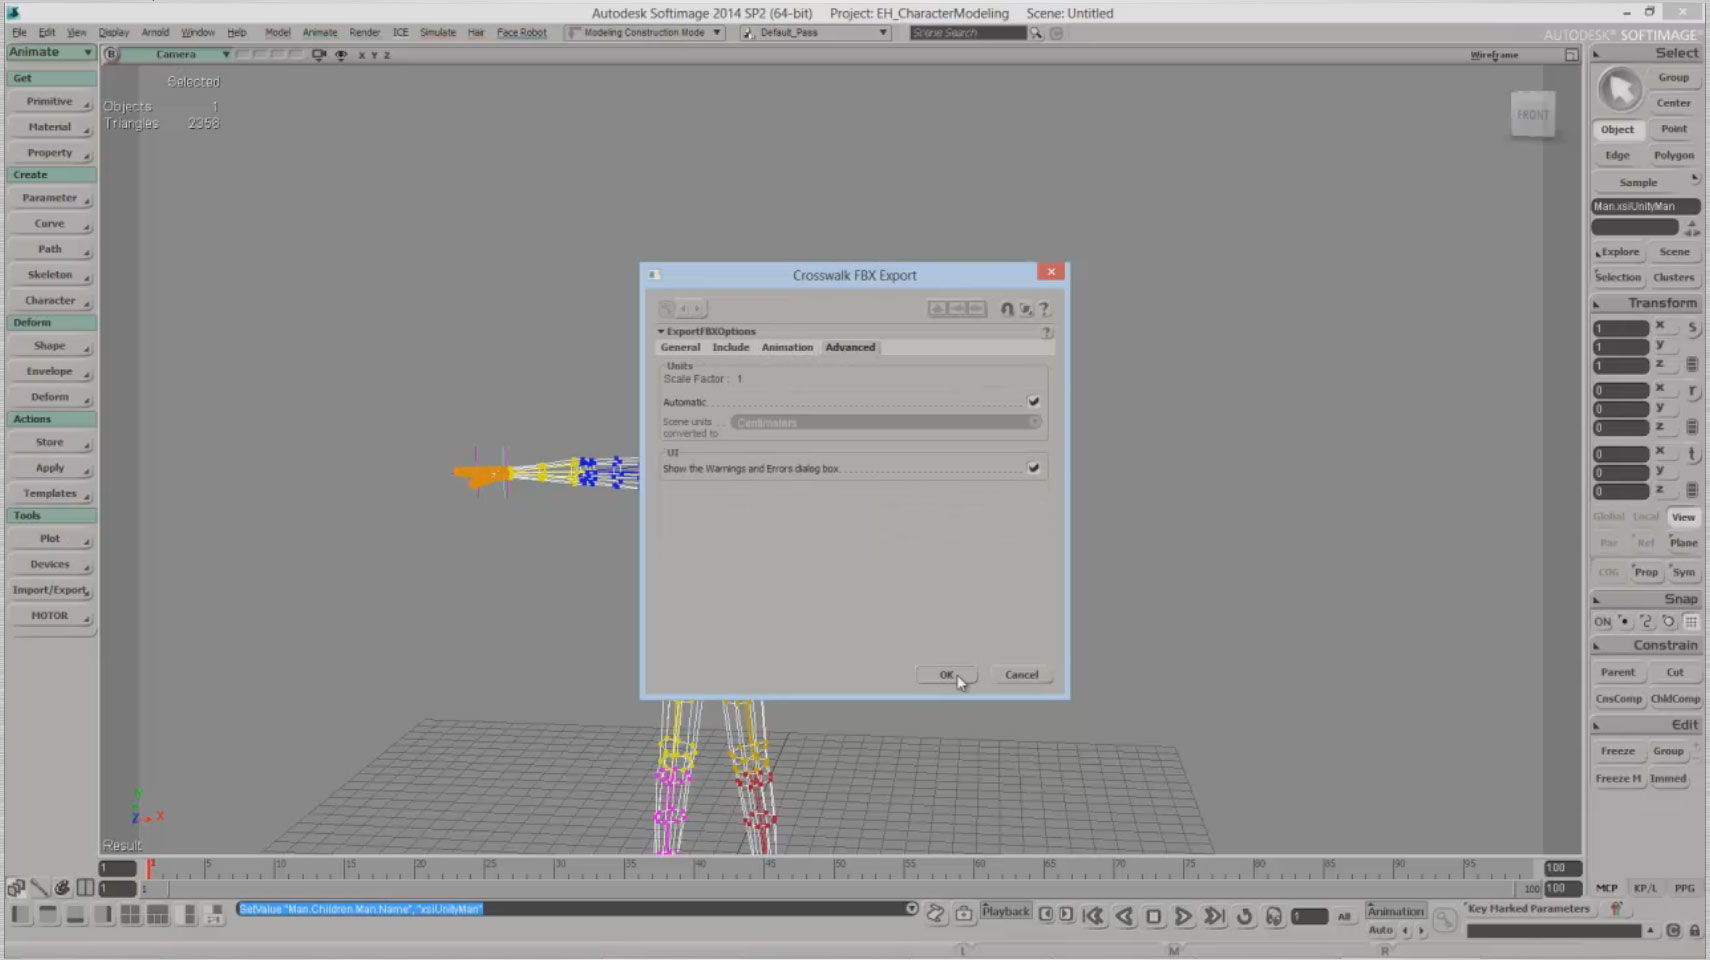
Next go to the File menu and pull down Crosswalk/Export FBX. I recommend exporting to the models folder in your project but you can select any folder you desire. Name your exported file and press okay.

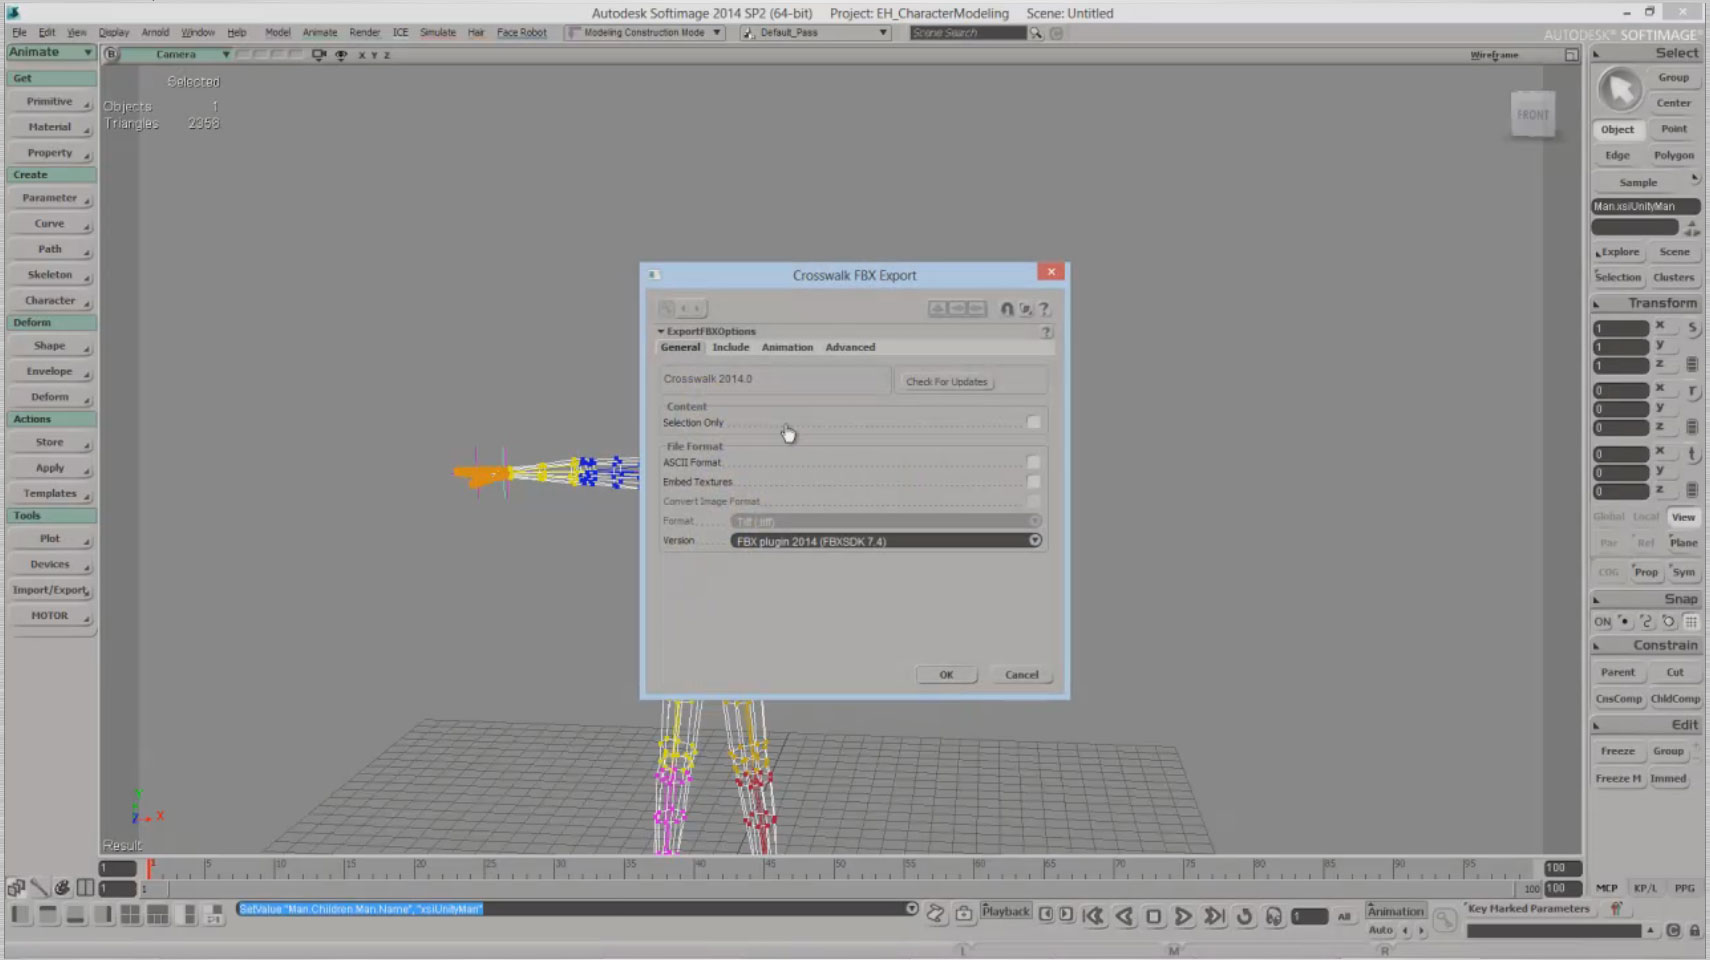
In the Crosswalk FBX export options leave everything unselected in the General tab.

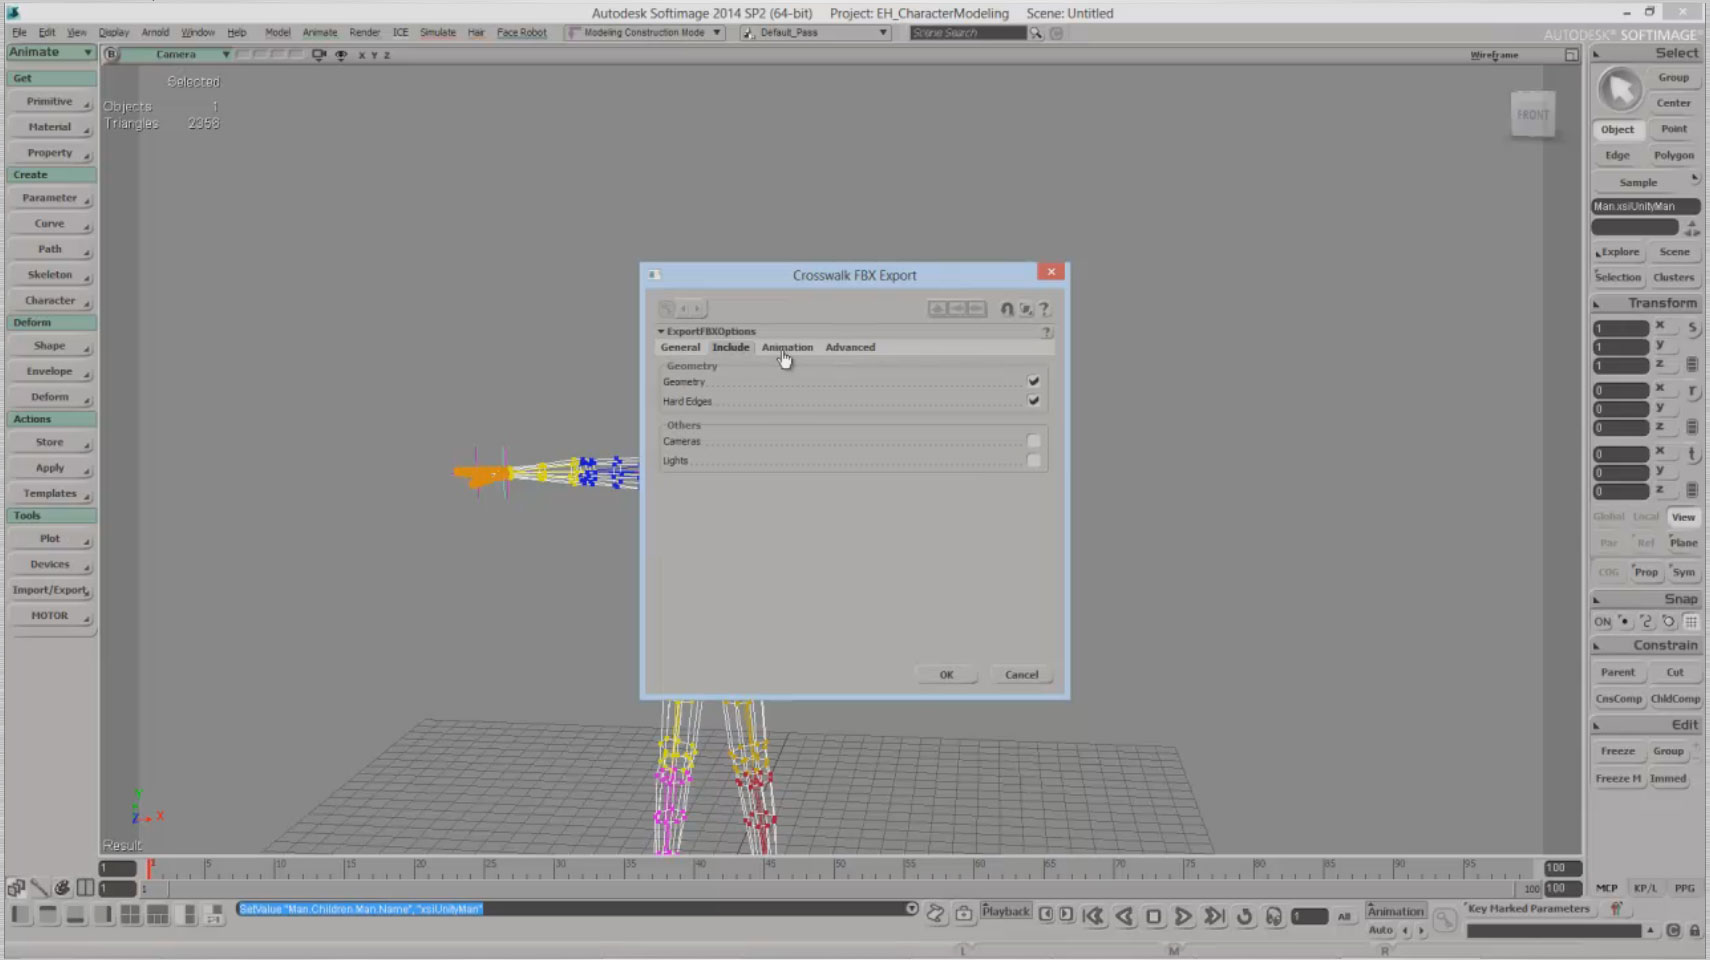
In the Include tab, deselect cameras and lights.

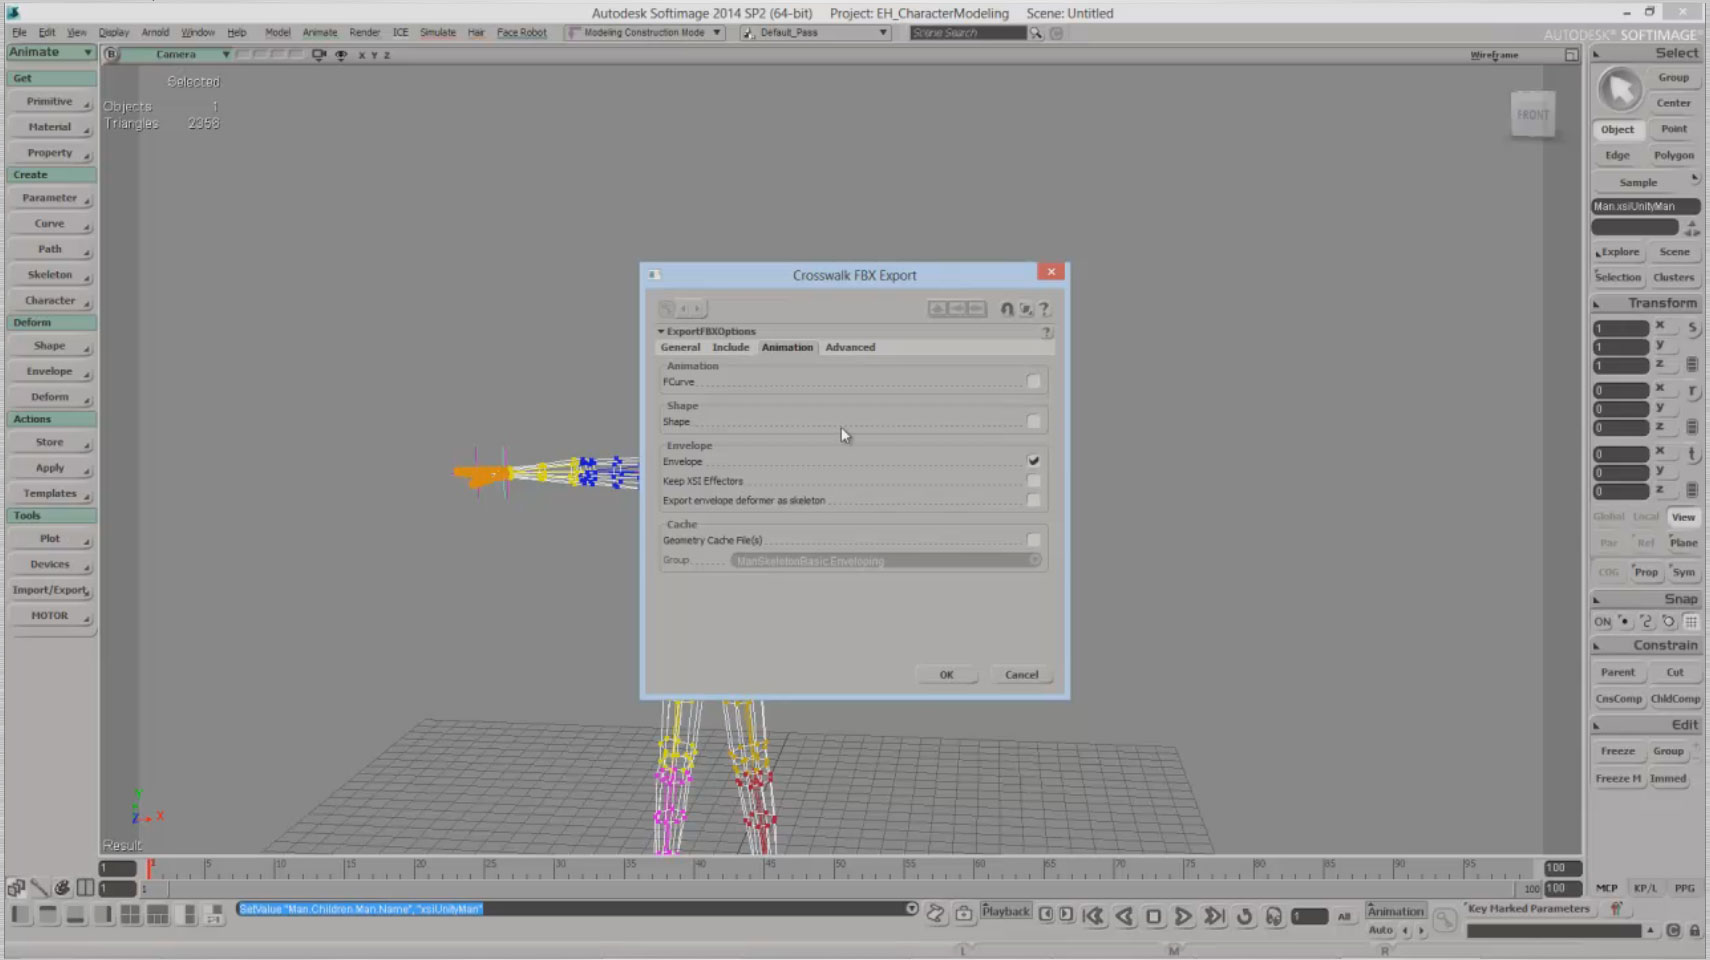
In the Animation tab, deselect S-curve and shape and in the Advanced tab, leave everything as is.

You’ll get an FBX warning that you can safely ignore.

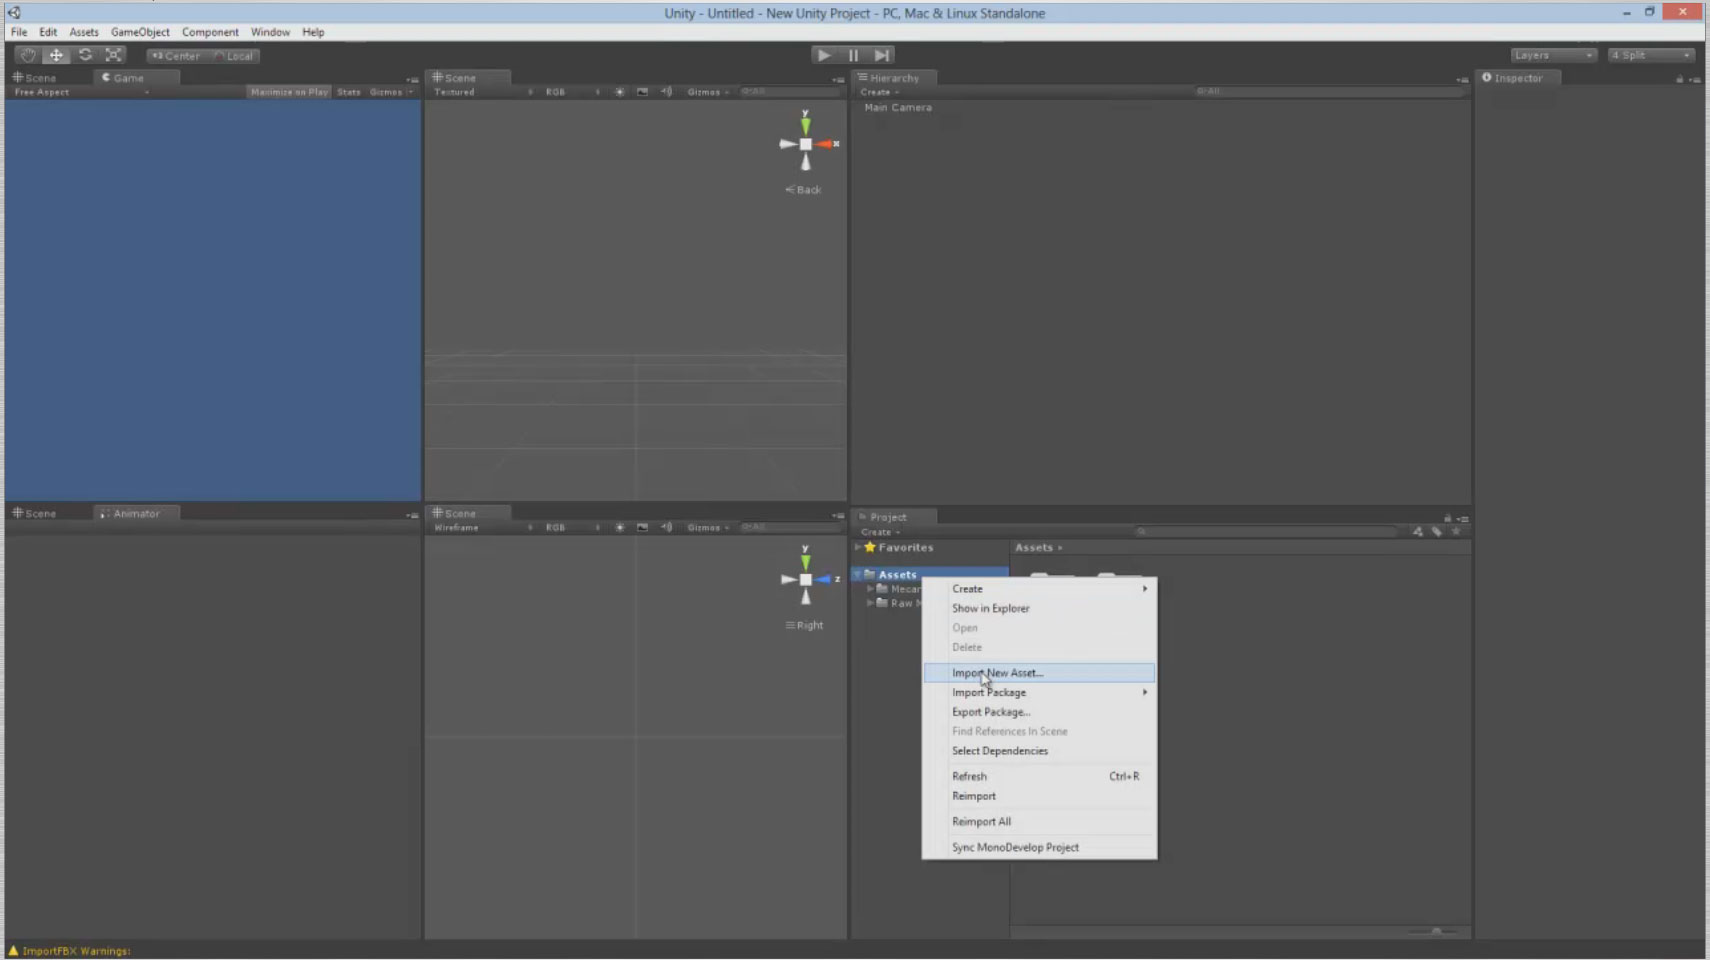
Switch to Unity and create a new scene. Right-click on the Assets folder and select Import New Asset. Navigate to the folder where you exported your model. Select the FBX file and click Import.

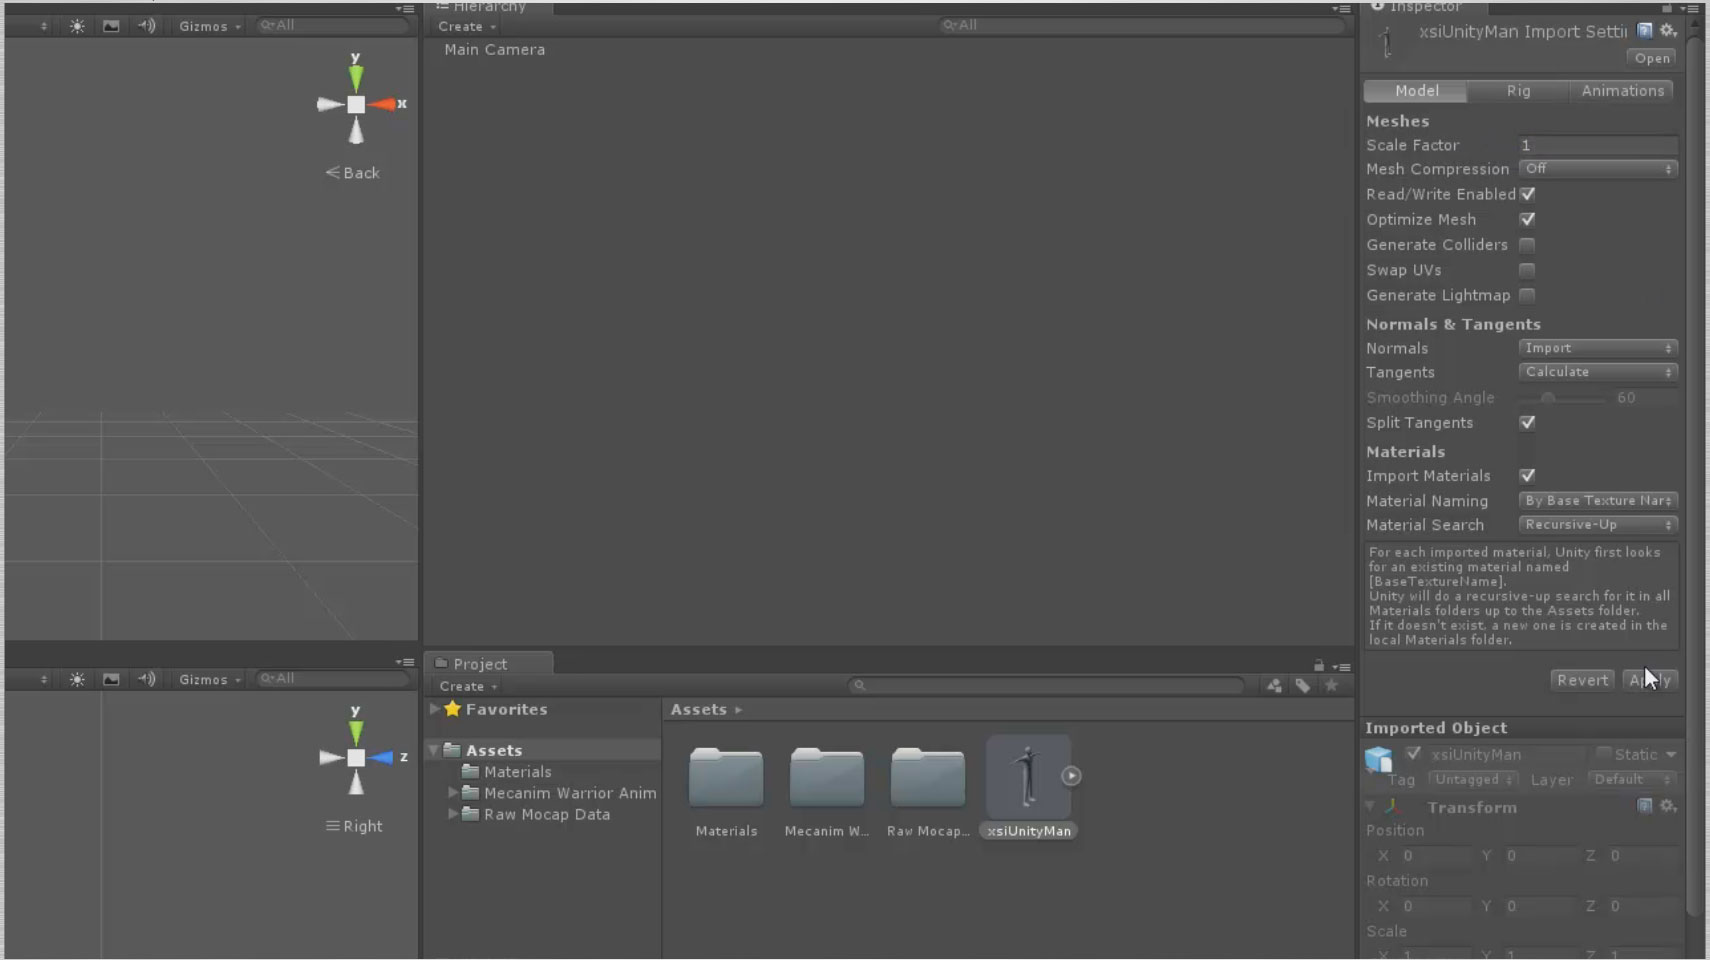
Select the imported xsiUnityMan in your Assets folder, look in the Inspector tab and click the Model button. Here, set the Scale Factor to 1 and then Apply.

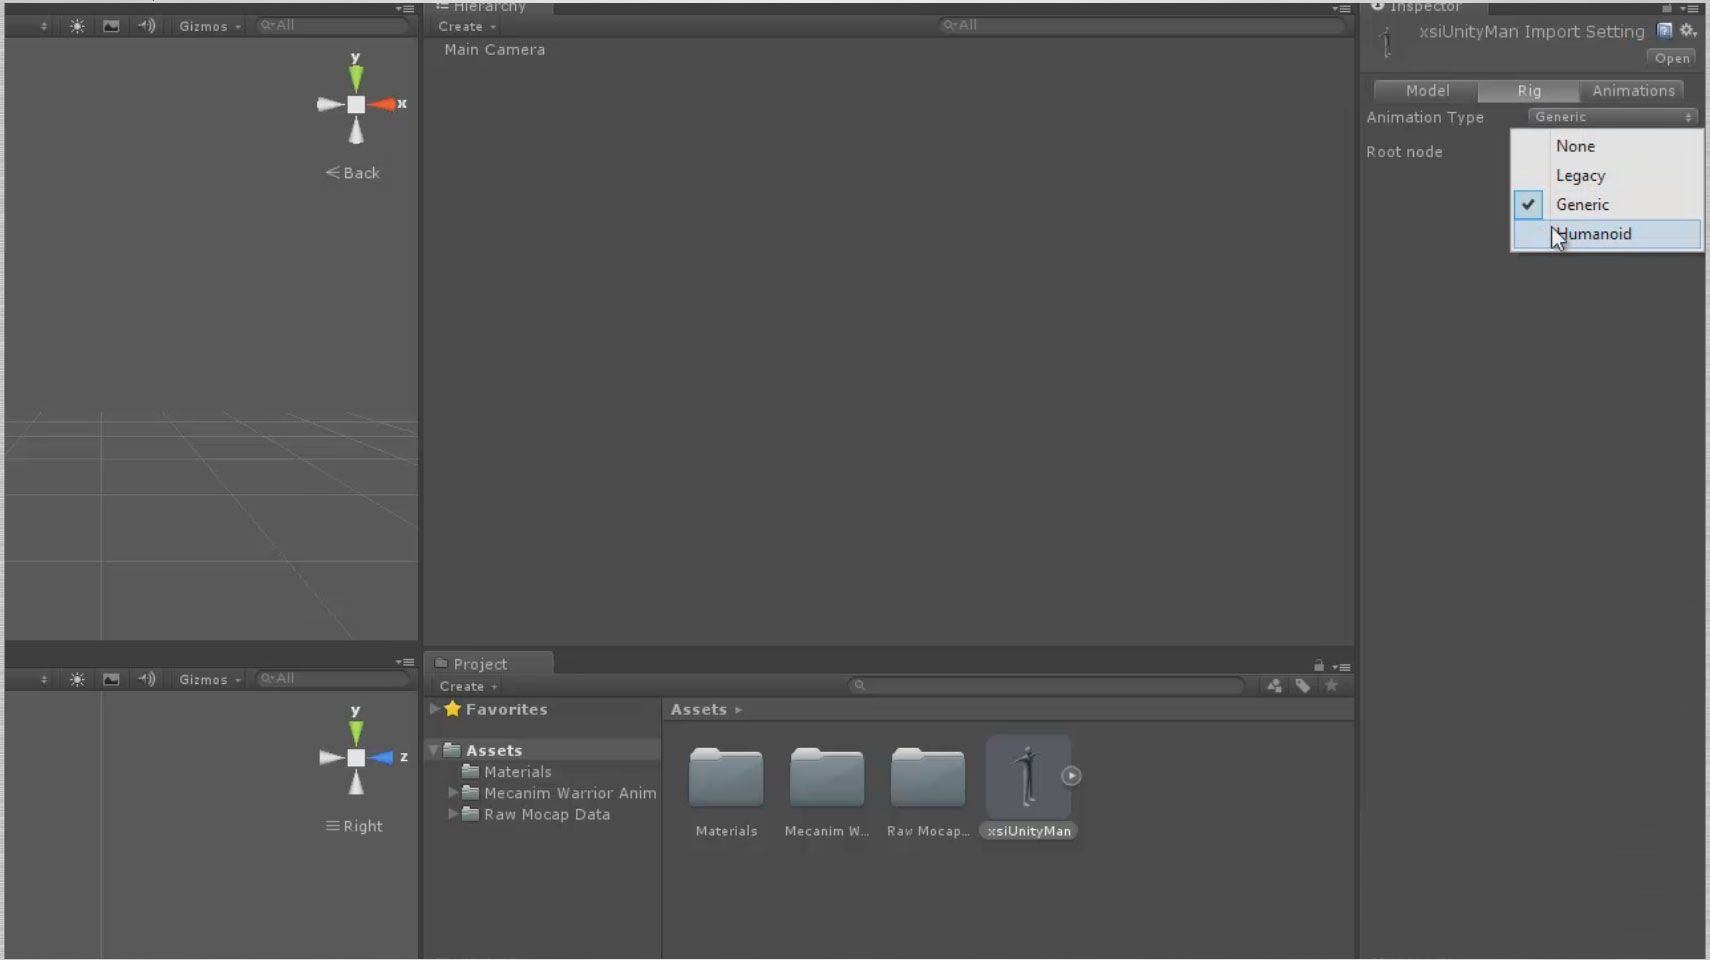
Next, select the Rig button, go to the Animation type and pull down Humanoid.

Select Apply and then Configure.

Before proceeding, Unity will ask you to save the scene.

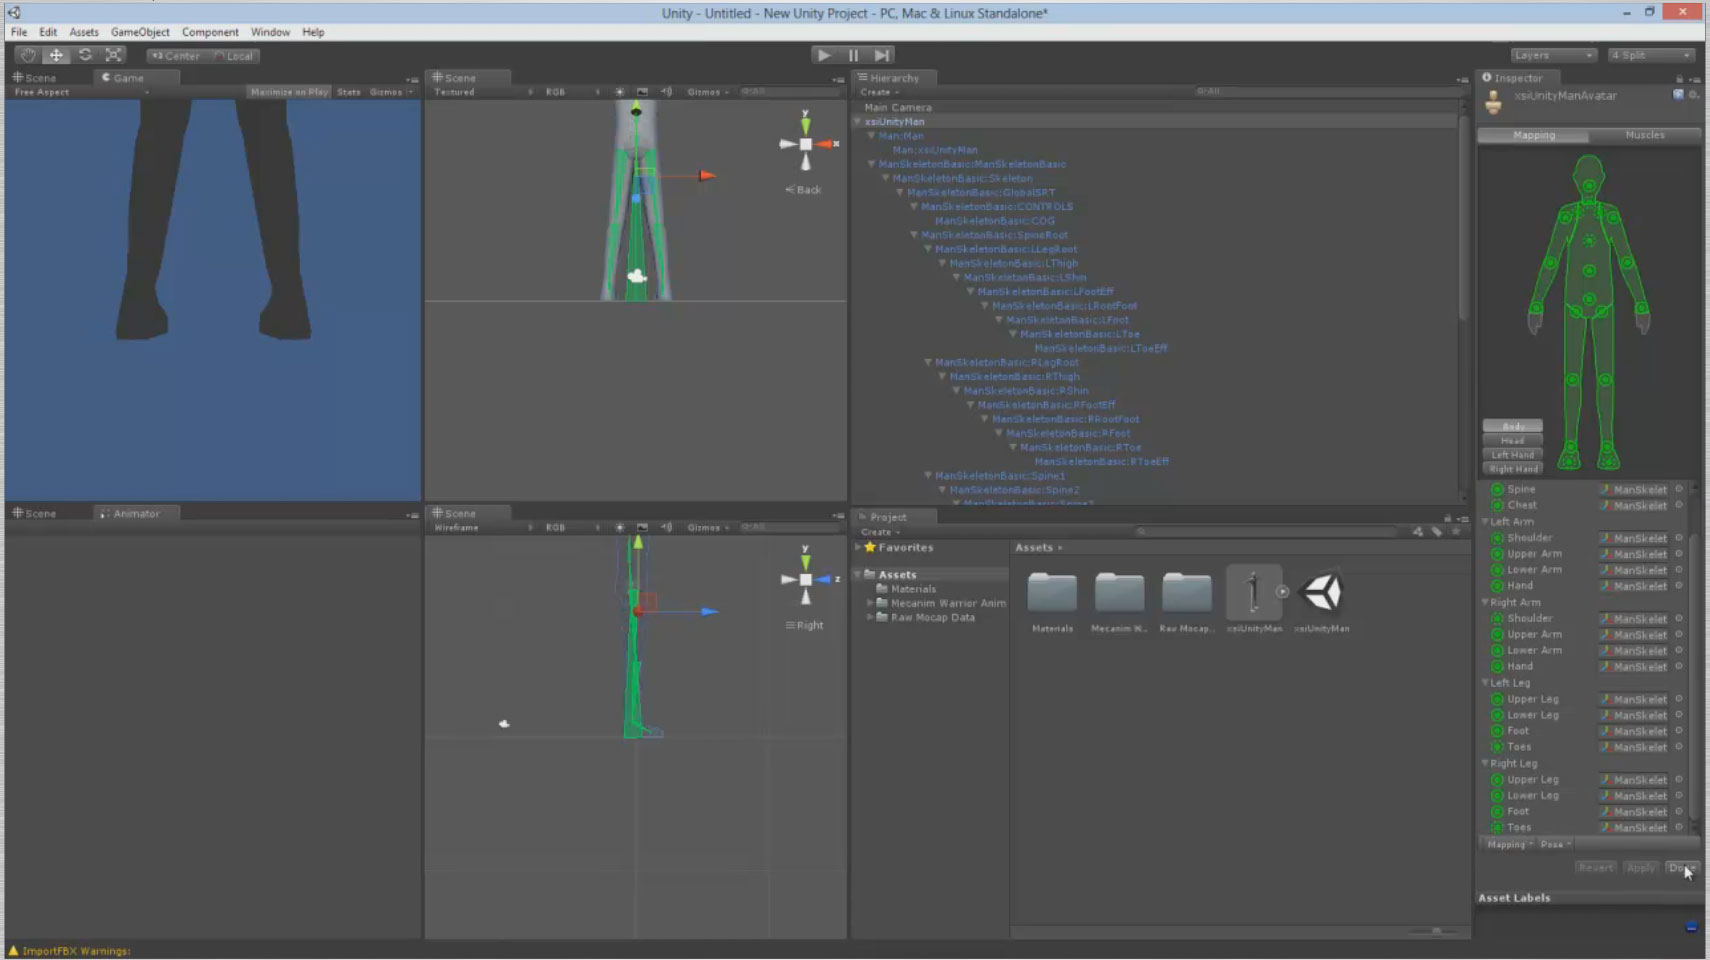
You'll next configure your model’s avatar. In this case, all of the automatic mapping came in correctly, so just click Done.

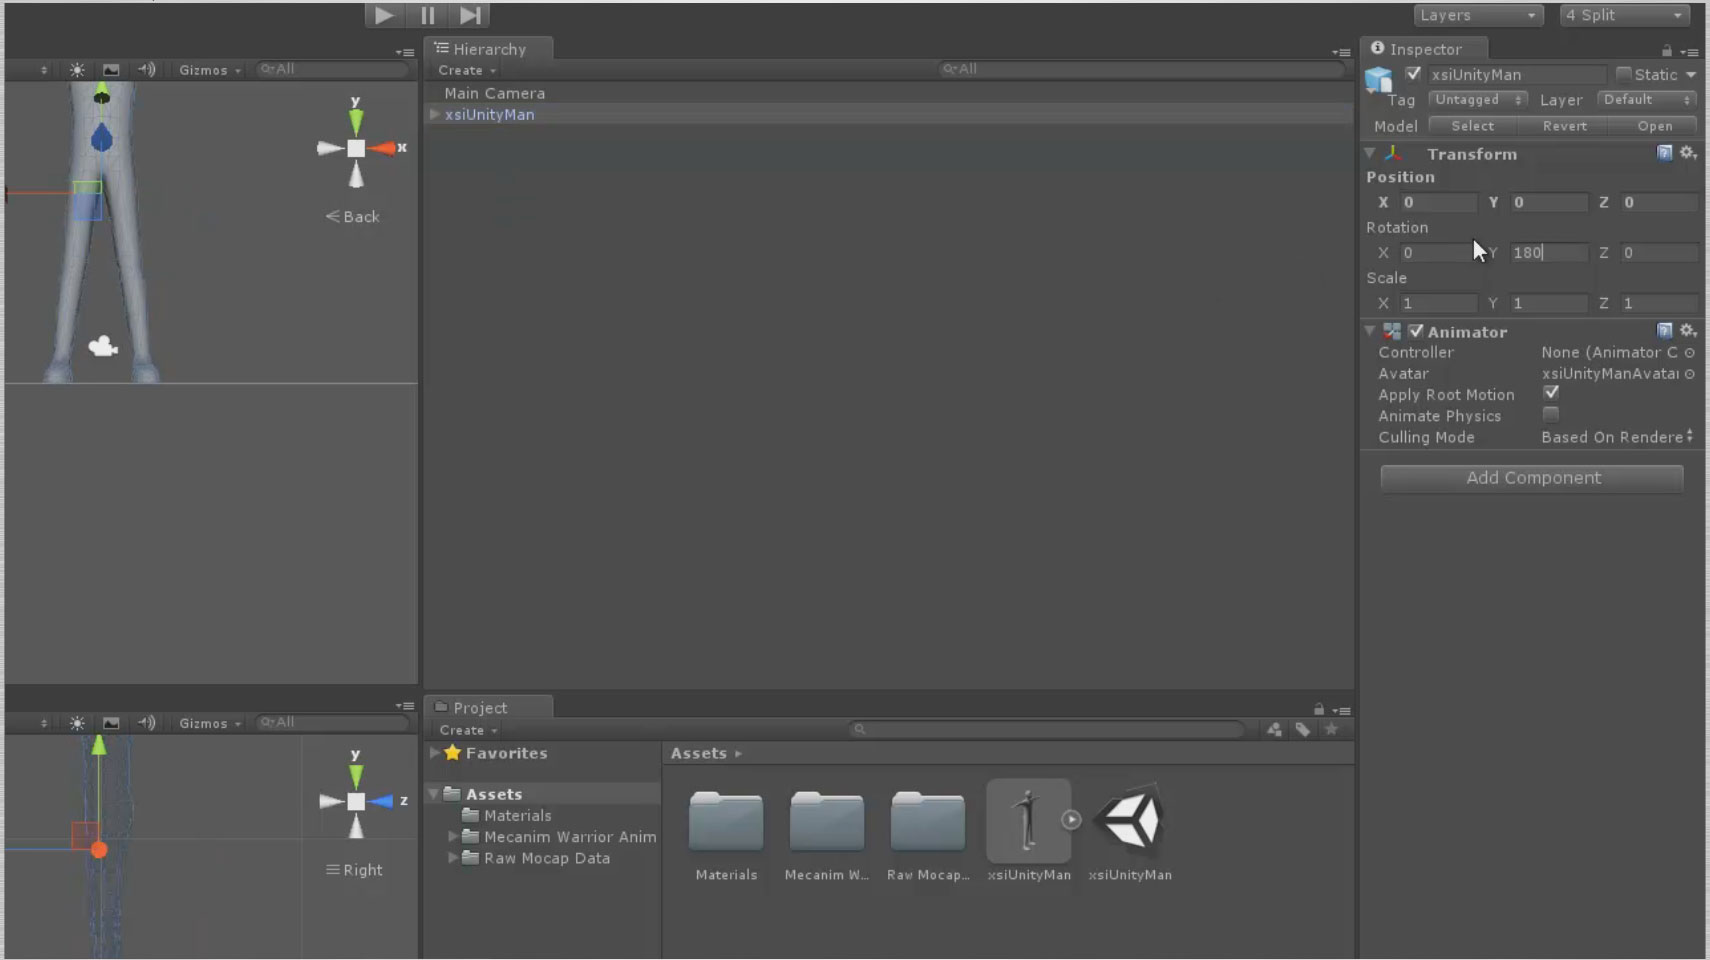
Now drag the xsiUnityMan model from your Assets folder into the Hierarchy window. This will place the object at the center of the world. You will need to rotate the character 180° on the Y axis to face the Unity camera.

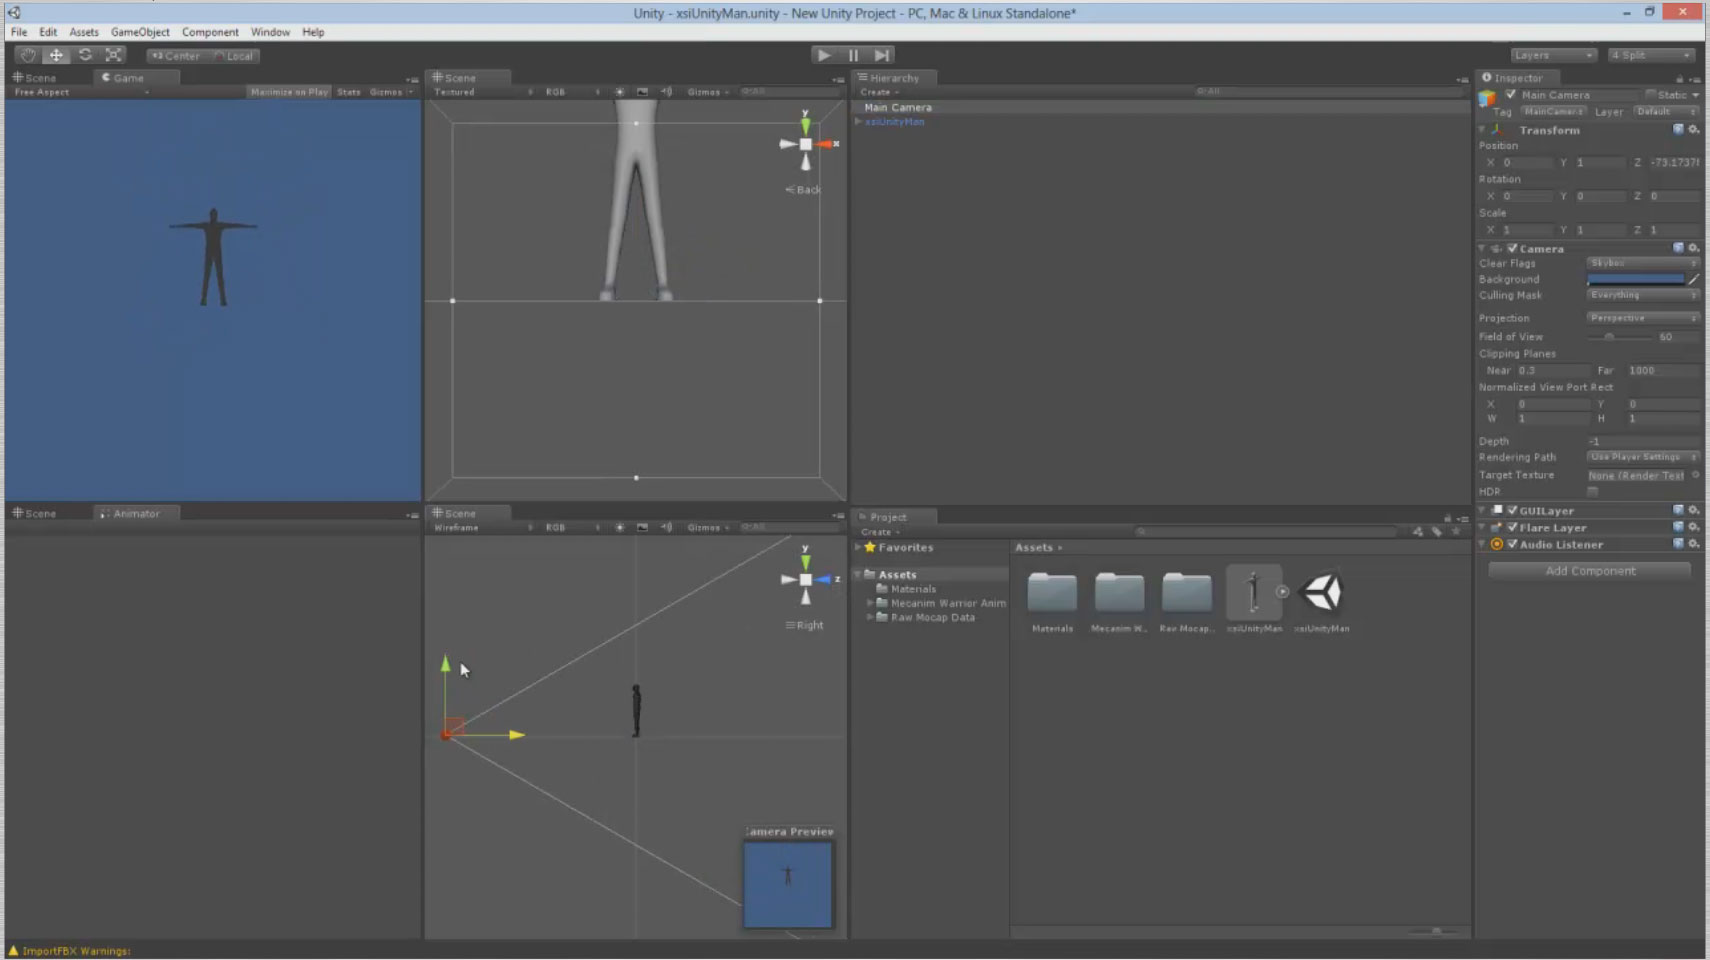
Frame the xsiUnityMan in your scene by selecting the Main Camera in the Hierarchy window and then dragging the Translate manipulator in one or more of your scene views.

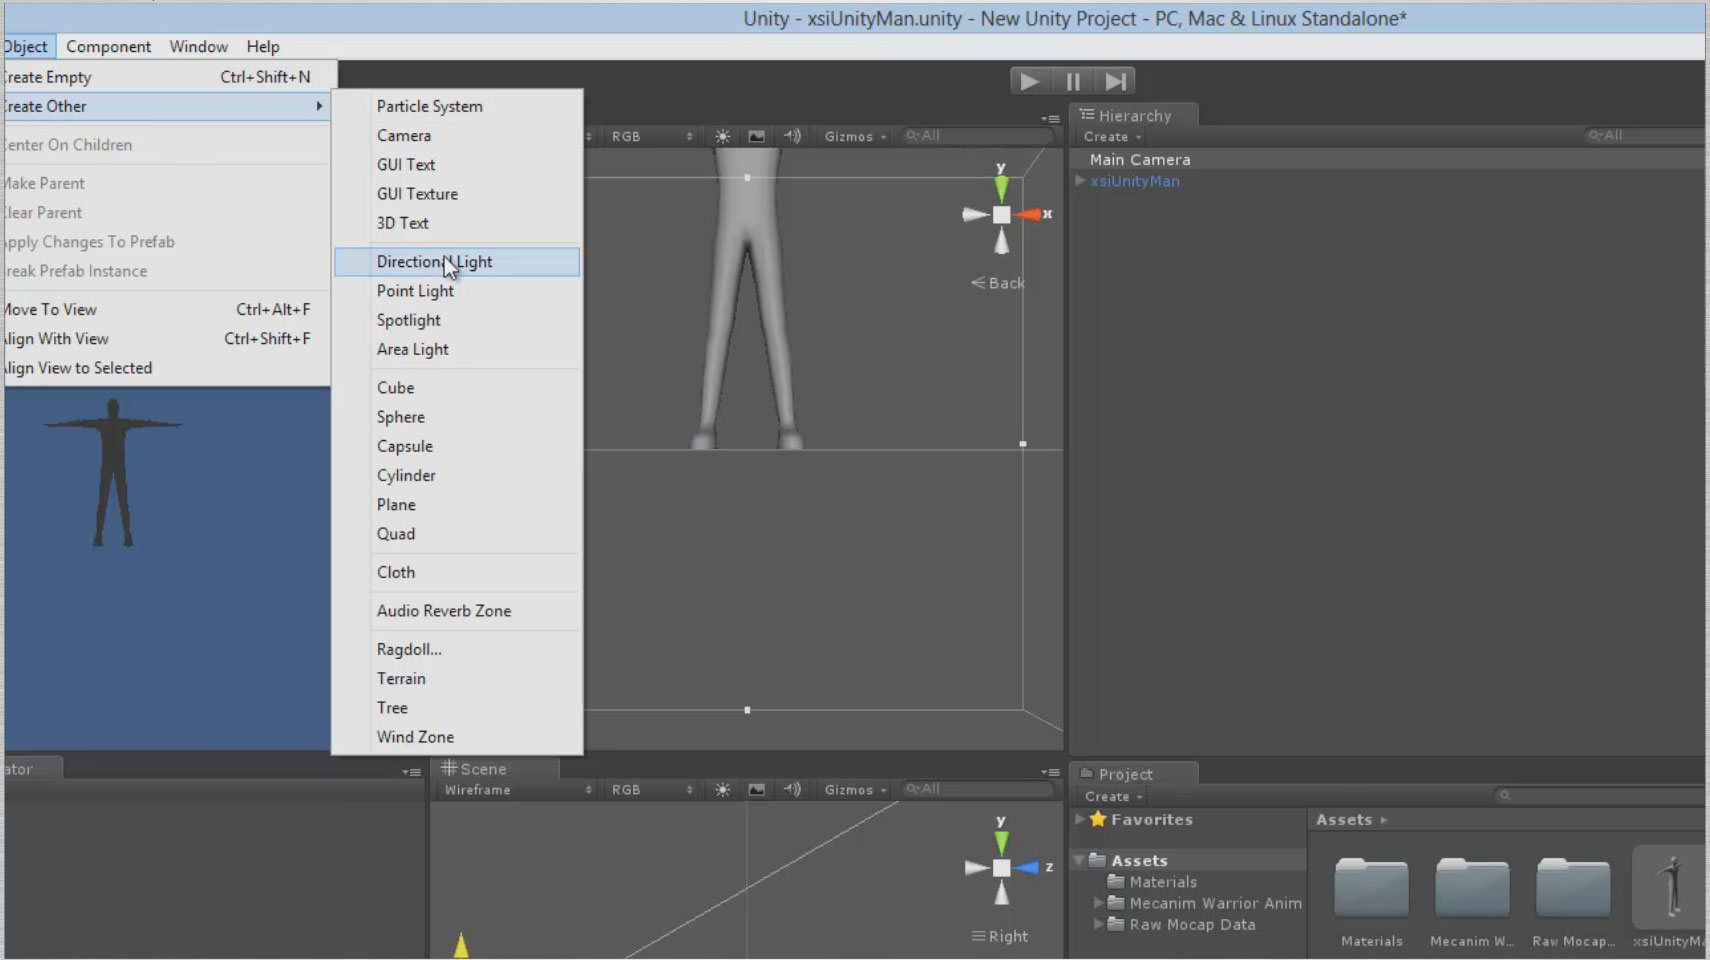
Add a light to the scene by going to the menu item GameObject/Create Other /Directional Light.

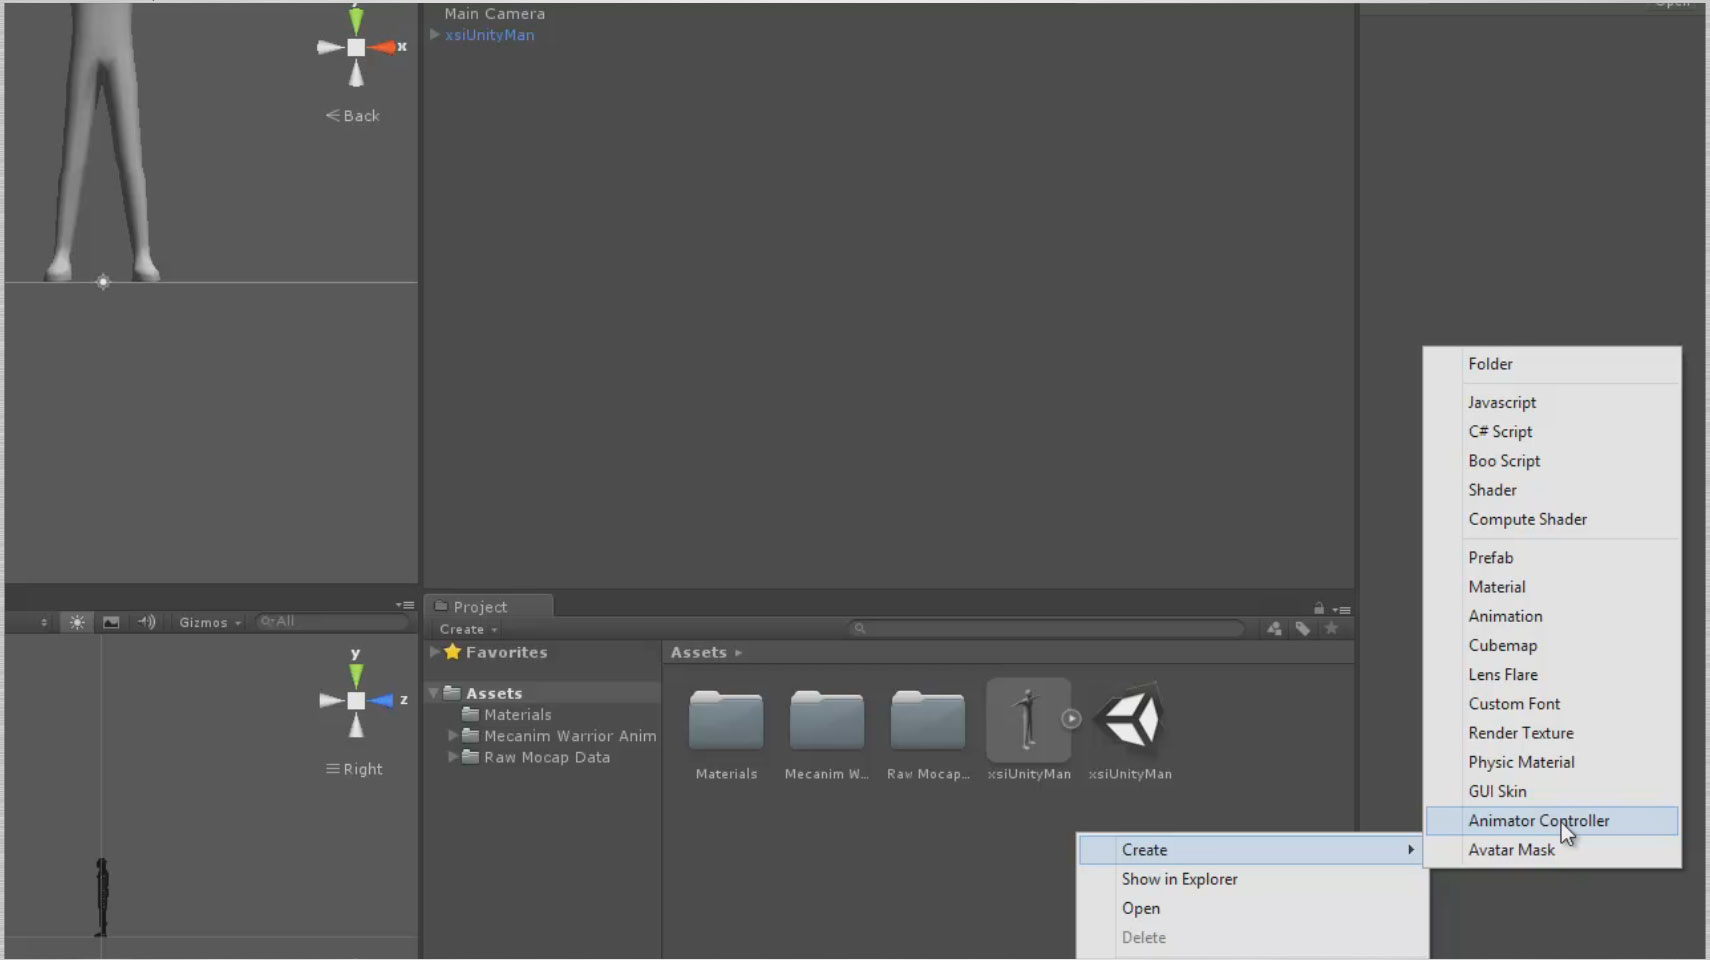
In the Assets window, right-click and select Create /Animation Control.

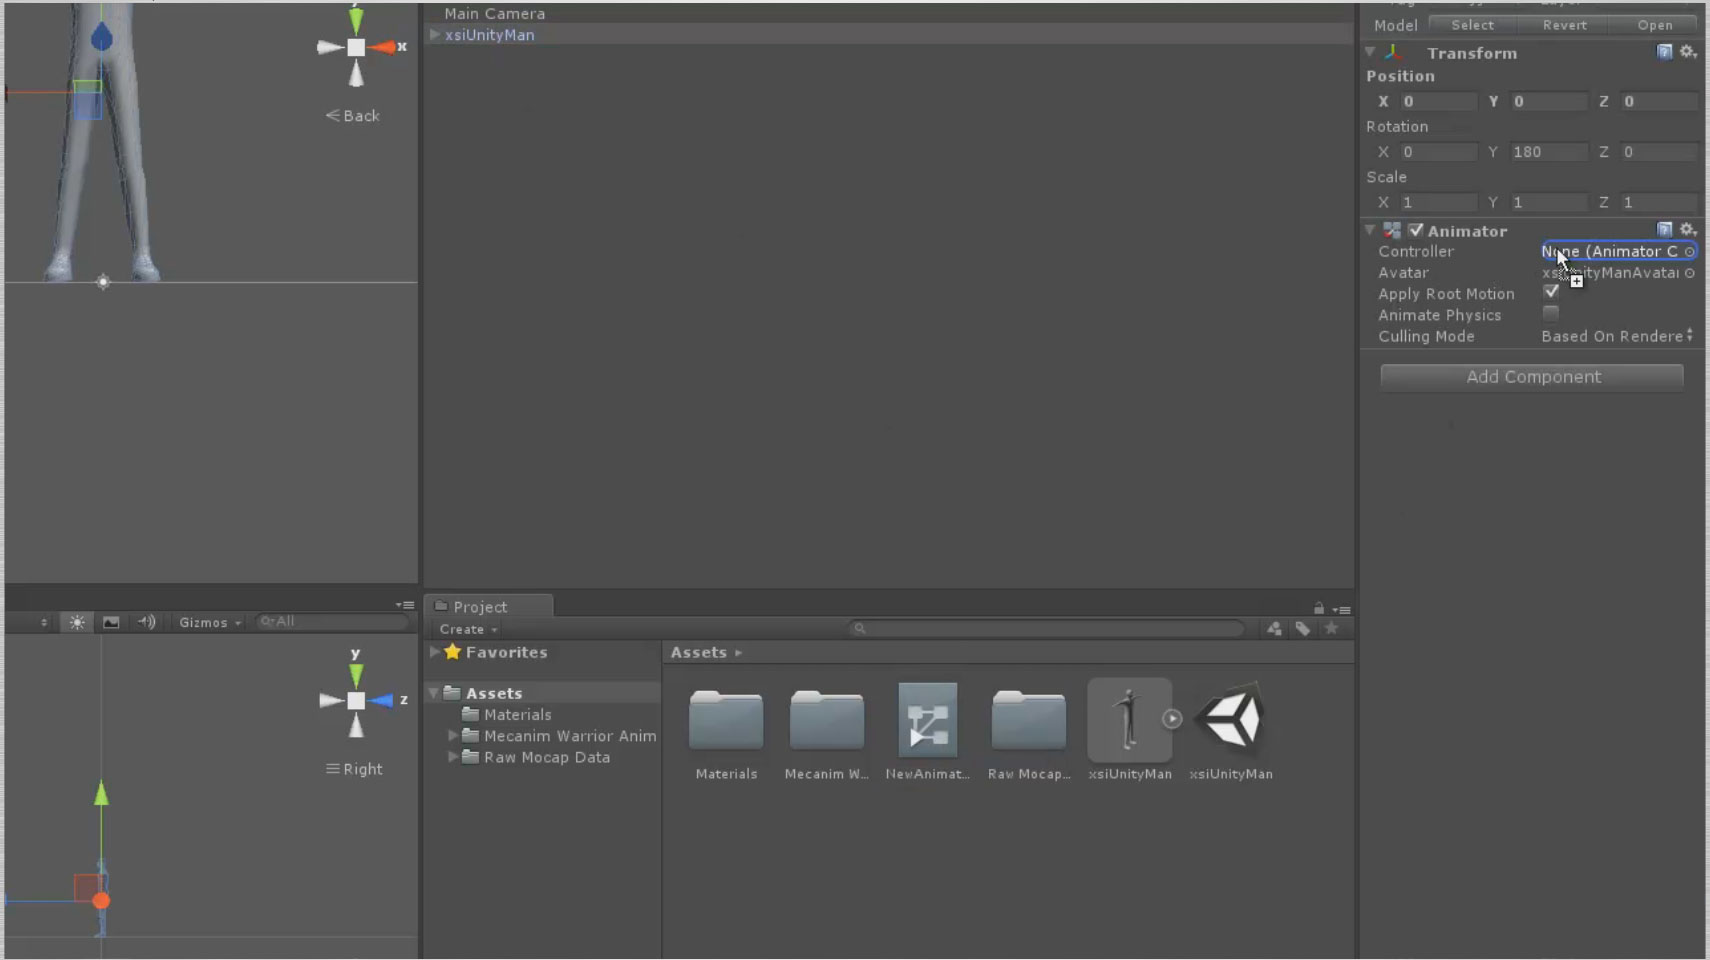
A new animation controller icon appears in your Assets window. Select the xsiUnityMan in the Hierarchy window and drag the new animation controller onto the Animator Controller slot in the object’s Inspector.

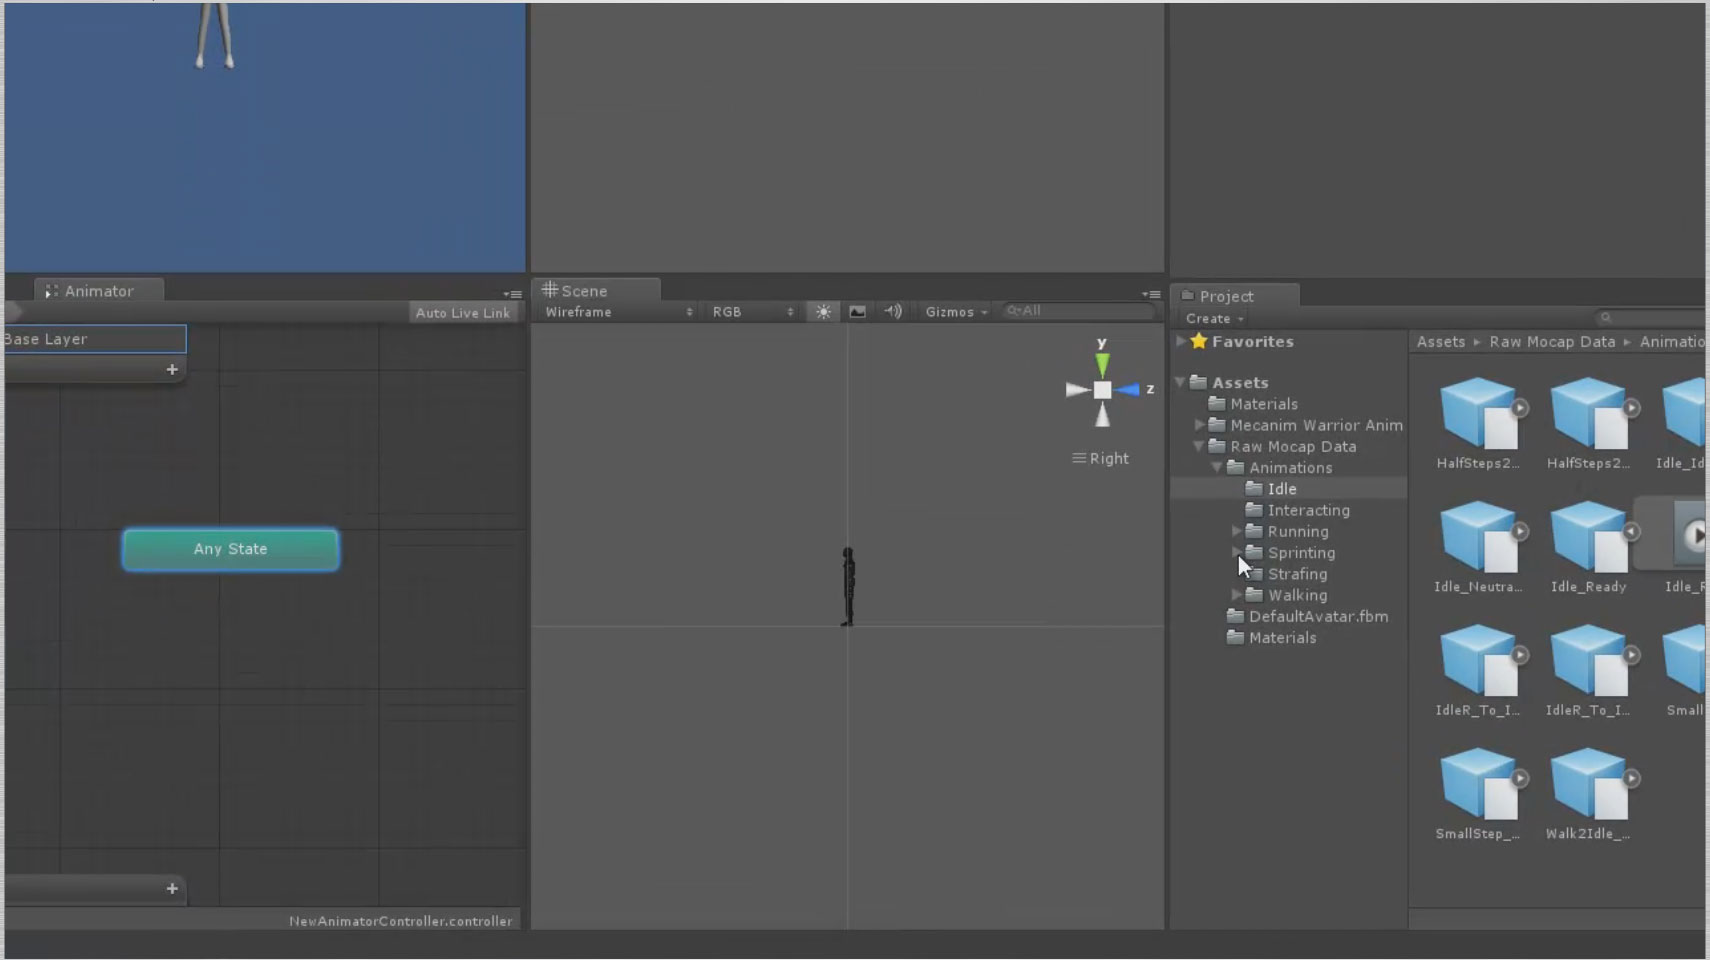
An Animator window will appear with a green Any State icon.

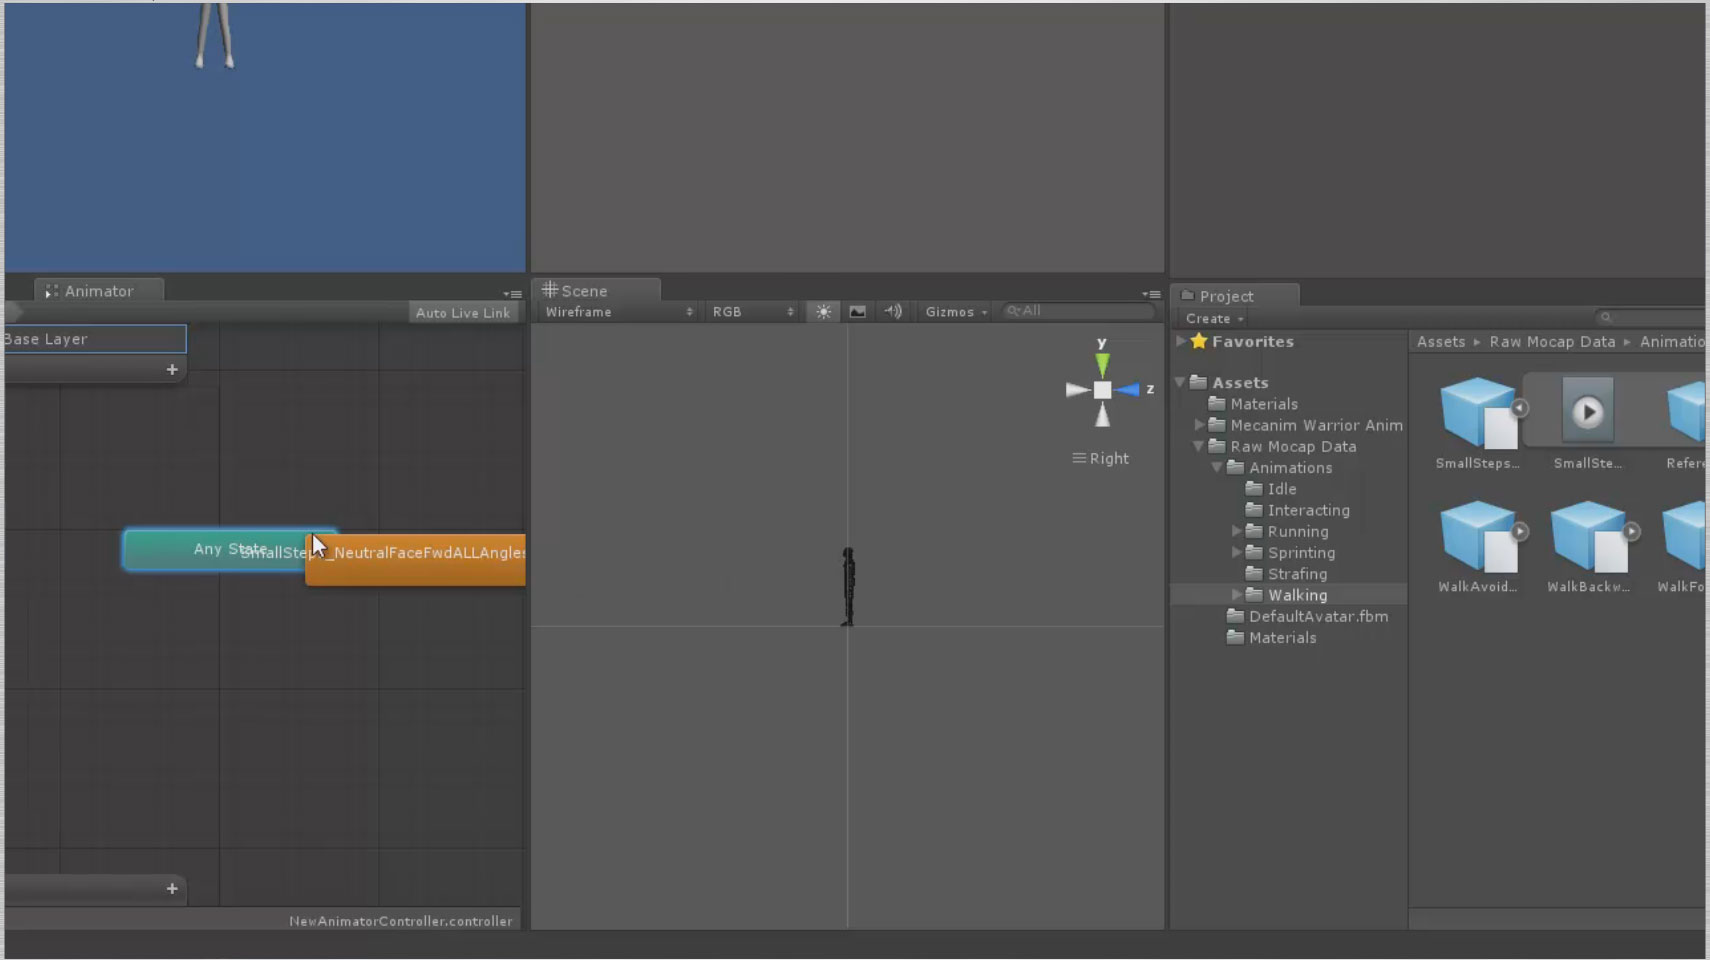
In the Assets folder, navigate to your Mecanim animations and select one. Drag it over the green Any State button and a new orange button representing the default animation is created.

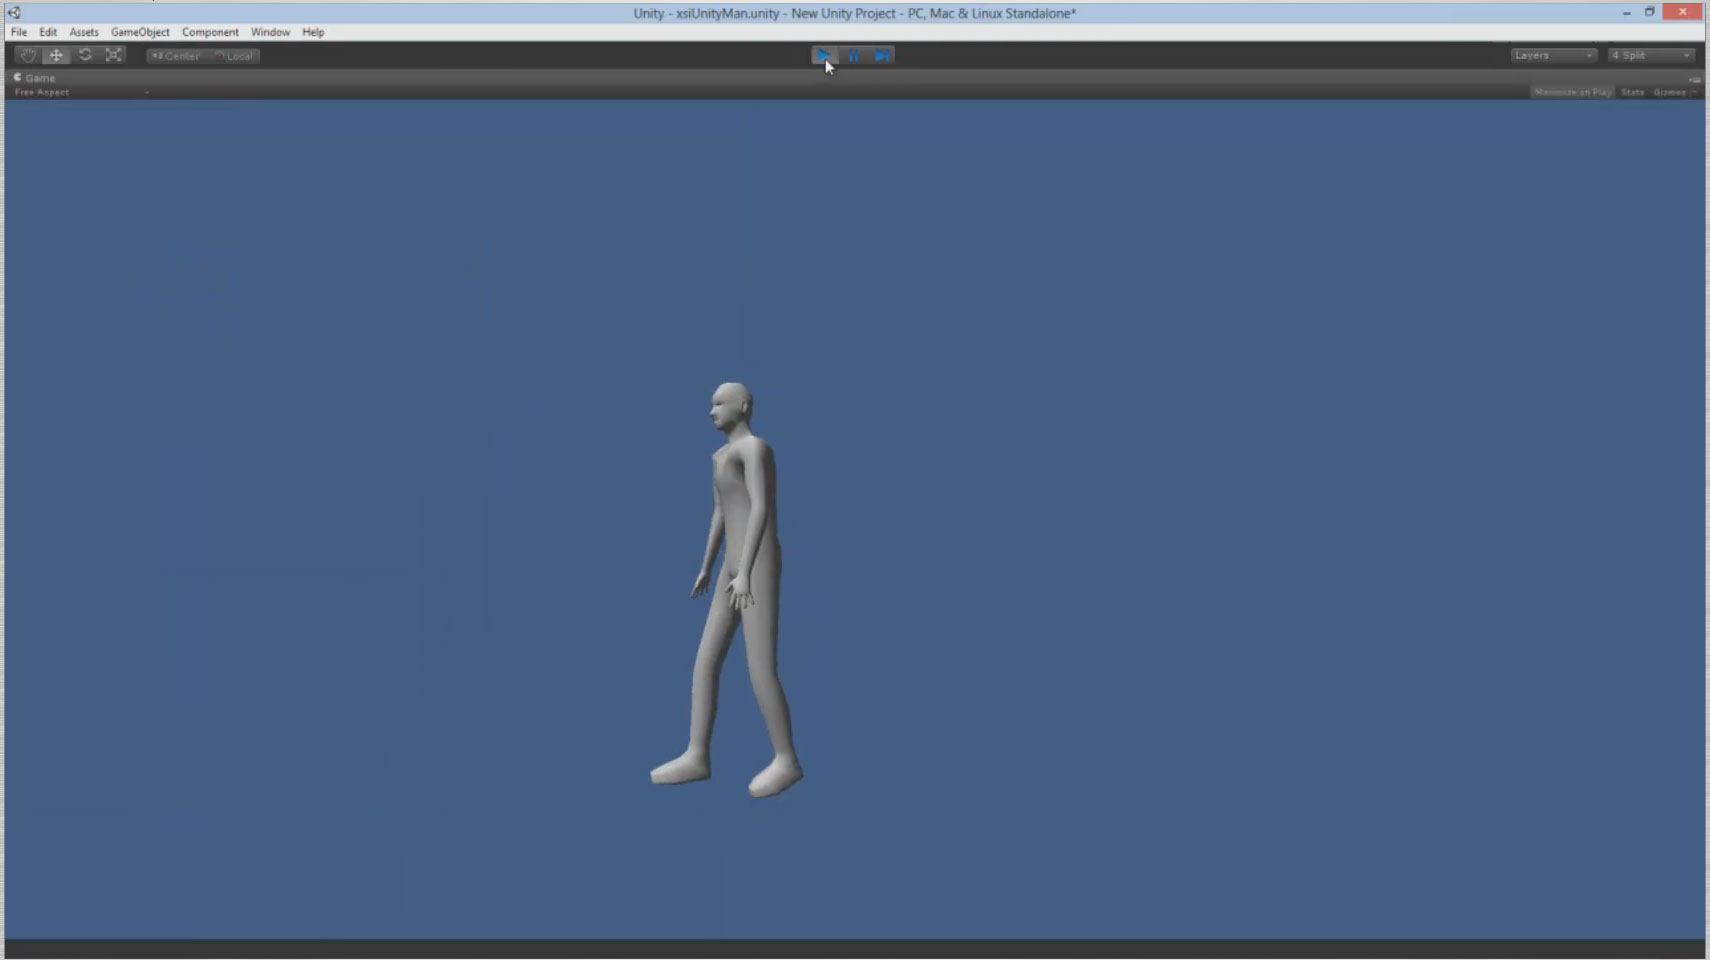
Press play to see the animation on your character. Stop the playback and test with other animations by dragging them into the Animator window, right clicking to Set as Default and pressing Play.

A basic walkthrough using Softimage's primitive man and basic skeleton to Unity 4.2's Mecanim animation system. No audio, but read the accompanying text at http://www.surfaceproartist.com

So that’s it. In approximately 1100 words or seven minutes, you know how to get rigged and skinned assets out of Softimage, into Unity and playing back Mecanim animations. Cool, huh?


Posted
AuthorRick Rodriguez
CategoriesTips