The following post was submitted by reader Jason Rushton (@thesonofj on Twitter). Greatly appreciate the contribution, Jason!

I realize these tips might be unique to just me, but maybe there are others that would benefit too?

Disable touch input

Sometimes when drawing on the Surface Pro, more often than not I'll touch the screen with the side of my hand, accidentally dragging the canvas, or causing inadvertent brush strokes before I've made a mark with my pen.  This can be a nuisance.  I've found I like doing artwork with the capacitive touch disabled, but still having the stylus be fully functional.

To do this I found the specific device that can be disabled in the Device Manager.  However, it can be a pain to manually go into the Device Manager and disable this every time I want to draw.  So I've created a batch (.bat) file to disable this, which I just leave on my desktop.

Here is the code I put into the batch file:

--------------------

@echo off

echo Disabling touch input...

devcon disable "@HID\VID_03EB&PID_8209&MI_00*"

echo.

echo Press a key to re-enable the touch device.

pause

devcon enable "@HID\VID_03EB&PID_8209&MI_00*"

--------------------

What this will do is disable the touch device upon the file first being ran, but it leaves the batch file window open with a prompt to press a key to re-enable the device.  And like it indicates, once a key is pressed, the touch device will be re-enabled (and if I don't have my keyboard attached, I use the on-screen keyboard to do a key press).

I've attached a screenshot showing how this looks in the Device Manager when the batch file is running (note: it's not required to open the Device Manager to run the file).

disableTouchInput.png

And one other thing to note is that I'm not sure if the device ID that I disable ("@HID\VID_03EB&PID_8209&MI_00*") is specific to my Surface Pro, or to just the first-gen Surface Pros, or if it works with all models.

Power-Grid

The second tip compliments the first tip, but can still be used independent of the first tip.  Yesterday I saw a review for a mobile app called Power-Grid (http://power-grid.roccat.org/en/Home/), which lets you create a virtual remote on your phone, with customizable buttons to control your PC.  I started making a remote that will simulate certain hot-keys that I use often in Photoshop (e.g. resizing the brush, rotating canvas, eyedropper tool, etc.)  This lets me hold my phone in one hand, or I can set it on the desk next to the Surface Pro, and quickly use hot-keys on my phone as I'm drawing.

EDITOR'S NOTE: You don't have to create your own control grid for Photoshop. Once you register on the Roccat site, there is a free Photoshop CS6 grid available in the Store. You'll eventually want to customize it with your own inputs, but it's a great launching point and works with PS CC.

* * *

I hope these tips make sense.  If you want me to elaborate on anything, let me know.  And like I mentioned earlier, this may something that is unique to my workflow and may not work for the majority of others, but maybe there are a few out there who may benefit.

Thanks again for the work you put into surfaceproartist.com.  The information you provide has been great.

Posted
AuthorRick Rodriguez
10 CommentsPost a comment

When I returned to the world of 3d modeling after a long absence, one of the most helpful books I found to help get me back into the swing of things was Antony Ward's Game Character Development in Maya (2004).

Besides providing an excellent foundation to the state of computer graphics at that time, the book also introduced me to Ward's easy to follow teaching style and his whimsical pinup models. Wanting to know more about his work led me to discover his preferred modeling tool: a low-cost program named Silo

The product of a three-man development team called Nevercenter,  Silo is a powerful, compact, uncluttered and easily customizable subdivision modeling program  that became very popular among indie modelers and game developers. Despite its popularity and perhaps due to its ultra low price ($159, often discounted to $109), work on Silo slowed to a crawl as Nevercenter turned to mobile app development and the company hasn't published any updates to the software in several years.

Like most users, I've assumed Silo is abandonware and haven't thought about it seriously except to confirm that it loads on the Surface Pro.

In the meantime, Ward has reproduced his Maya game character book as a series of web tutorials and has become a prolific guest contributor to the subscription training site Digital Tutors.

This morning I spotted a teaser for Ward's next tutorial, Getting Started with Sculpting in Silo (see below). I'd forgotten Silo even had sculpting capability, and the promised emphasis on interface customization and optimization for the Wacom Cintiq tells me I need to dive deeper into this tool on the Surface Pro and other Windows 8 tablets.

 When the video is released I'm going to go try to follow it on the Surface Pro and identify any potential pitfalls. If you've already got Silo 2.2 up and running as a modeling/sculpting option on your tablet pc, I'd love to hear about your experiences. In the meantime, if you're interested in learning 3d modeling and sculpting, you'll find few capable, lower-cost options than Silo.


Learn more: http://www.digitaltutors.com/11/training.php?pid=1422 Silo has a great suite of modeling tools but with this tutorial we want to introduce you to another, often overlooked, aspect of the application and those are its sculpting tools. Before we dive in and begin sculpting we will start the course by looking at how to quickly configure Silo to work in harmony with a Wacom Cintiq. This is the hardware I will be using throughout the tutorial but its important to state that you can easily follow along using a keyboard and mouse, or any other graphics tablet. Once the environment is set we will then take a basic Hoola Girl model and work over each element, enhancing the surface detail using just the Paint Displacement tools. You can expect to learn with this tutorial that Silo is more than just a modeling package. Its sculpting tools may be basic, but with time and effort you can achieve great results in a short amount of time.


ADVERTISEMENT

Purchasing from these links directly supports the maintenance of this blog.

3D Modeling in Silo: The Official Guide
$34.08
By Antony Ward, David Randall, Nevercenter
Buy on Amazon
Posted
AuthorRick Rodriguez
CategoriesTips

UPDATE: The January 15, 2014 release of Adobe Illustrator CC (version 17.1) makes this hack unnecessary. The new software now features HiDPI display support. http://surfaceproartist.com/blog/2014/1/16/new-adobe-illustrator-cc-improves-surface-pro-windows-tablet-support No word yet on when the support will extend to Photoshop. 

* * *

Blog reader Luis (last name withheld on request) has discovered a clever hack that scales the Adobe Photoshop and Illustrator interfaces. I've tested his solution on my Surface Pro 2 with the CC versions of both programs and it works exactly as advertised.

Adobe's microscopic UIs flunk the patented Surface Pro Artist fan finger test.

Though not exactly touch friendly, the scaled UI won't cause eyestrain and is very easy to target with the pen.

CAUTION: Editing the Windows registry is not for the faint of heart. Only advanced users should attempt this fix. Make sure to backup your registry before making these changes. Refer to this page from Microsoft for more information on registry editing: http://support.microsoft.com/kb/256986

Below is Luis' note:

Hi, I've found a way to make Adobe Illustrator and Photoshop to respect Windows PPI scaling, AKA, make their UI usable instead of microscopic.

The reason these apps have such tiny UIs is because they tell Windows, in their internal manifest files, that they are high DPI aware and that Windows does not need to scale them.


As you can easily see, that's not the case, not even by a long shot. Our objective then is to replace Adobe's bogus manifest, by one that tells the truth, that these applications are not high DPI aware.

The problem is, the manifest is internal, stored as a resource inside the .exe file, you can change it, but then you'll break the file signature making Windows complain every time you try to run these apps. So we're going to use an external manifest file, however, since Windows XP SP 2 internal manifests have precedence over external ones.

We need to change that and here's what you have to do:

1. Enable Windows to prioritise external manifests by creating and setting this registry key HKEY_LOCAL_MACHINE\SOFTWARE\Microsoft\Windows\CurrentVersion\SideBySide\PreferExternalManifest (DWORD) to 1
as mentioned here (no need to install the mentioned hotfix, just create the registry key)
http://support.microsoft.com/kb/912949/en-us

2. Create a Illustrator.exe.manifest file in notepad, paste this text inside, save it, and copy it to the same folder as Illustrator's exe file
http://pastebin.com/BZnKwU6a

3. Create a Photoshop.exe.manifest file in notepad, paste this text inside, save it, and copy it to the same folder as Photoshop's exe file
http://pastebin.com/AiZiicT6

4. Run the applications, no need to restart or anything else, and their interface should now have an acceptable size, but a but blurry as usual with this kind of scaling.

This has worked for me and made my Surface Pro a much more usable device. I hope that by divulging this information we can force the hand of [expletive deleted] Adobe to support High DPI interfaces.

I also hope that Microsoft doesn't patch this to stop it from working in the future, but seeing as this is a workaround for corporate apps to run I'd say we're reasonably safe (for now...)

Thanks!

Posted
AuthorRick Rodriguez
CategoriesTips
141 CommentsPost a comment

UPDATE 12/13: We've already published a new version with improved icons. Check out the details here.

ORIGINAL POST

When I published my review of 3d apps on the Surface Pro last week, many of you wrote to suggest I check out ArtDock. This fascinating utility creates a touch toolbar with common commands that can be used in conjunction with a pen. While we're waiting for developers to embrace touch and tablet oriented interfaces for their programs, this useful tool is the next best thing. 

I first encountered a sibling of ArtDock shortly after I launched this blog. The ArtRage Pen-Only Toolbar seemed pretty geeky at the time and not very necessary, given the relatively simple UI of ArtRage.

But the continued frustration with Photoshop forced me to take a closer look. It turns out that using and modifying ArtDock isn't as difficult as it first appears. The biggest challenge is to cobble together the various files needed to make it work on the Surface Pro.

To make sure credit is given where it's due, below are the sources I referenced when researching this topic. These links are not essential to getting the Surface Pro Artist ArtDock up and running, so you may want to skip ahead to the installation instructions links below.

These customized toolboxes, or docks, are made possible by an ingenious program called AutoHotkey, which enables users to assign common keyboard, mouse and touch commands to onscreen icons.

The AutoHotkey script  RawInputControlTest.ahk was first written for the Asus Eee Slate EP121. 

The script was then adapted for the Samsung Series 7 Slate here by tbaldree and dubbed Paintdock.

Konartist3D further modified the scripts at his DeviantArt page, creating GUIs for Photoshop, ZBrush, Maya and others and dubbing the program as ArtDock.

Over at TabletPCReview, DoctorBunsonHoneydew adapted the Konartist3D ArtDock for the Surface Pro.

Enter The Surface Pro Artist ArtDock

Although Dr. Honeydew's script is minimalist and very Surface-y, I found it to be a little inscrutable and not really aimed at artists. Therefore, I decided to go back to Konartist3D's work.

Because it was developed for a larger screen tablet, I decided to scale all his icons up 150%. The buttons are now a nice size that is difficult to miss. I also made all the toolbars 100% opaque because I wanted to make sure that the small type on some of the icons was readable.

Konartist3D also included a lot of desktop controls on his ArtDock that I couldn't make work on the Surface Pro, so I removed those. I also deleted Topogun and MyPaint controls because I didn't have those programs to test. Lastly, the original ArtDock includes a program called TGuard that toggles touch on and off. This is supposed to guard against stray marks, but I find it's very dangerous to use on the Surface Pro because it disabled both touch and pen control while I was experimenting with it. Needless to say, I deleted that as well.

Here is the resulting launcher.

Launcher.png

The ArtDock will open in the top left corner of your display. To move it, just drag the top left icon with your finger. The middle top icon minimizes the dock and the X closes the dock.

This first pass includes toolbars for Photoshop, Sketchbook Pro, Paint Tool SAI, Maya, Silo, ZBrush and 3DS Max.

The deleted icons for Topogun and MyPaint are included in the archive if you'd like to restore them.

Tapping any program icon loads the appropriate dock.

 
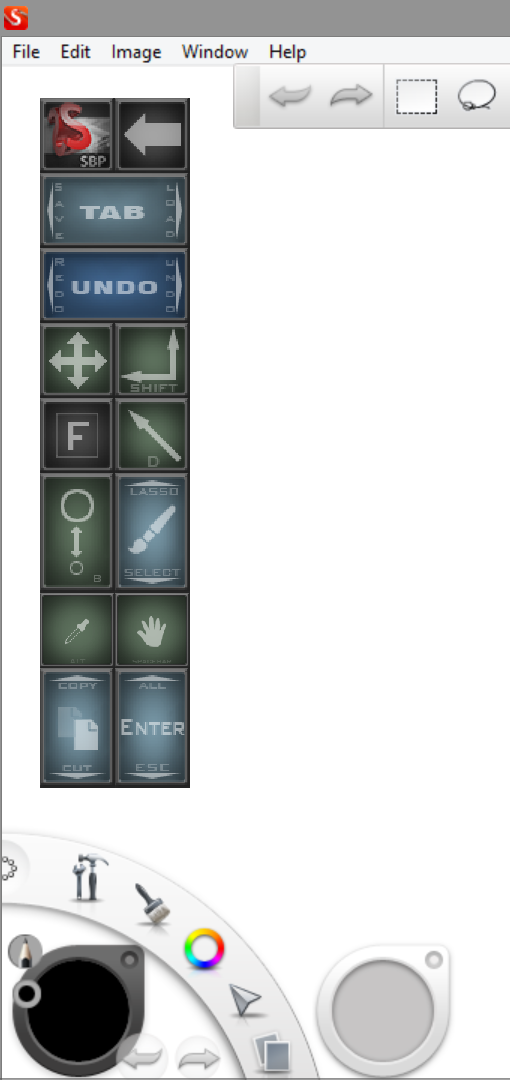
PhotoshopAD.png

Photoshop

To drag any of the program-specific toolbars, just tap and hold the program icon. Tap the Left Arrow to return to the launcher.

Several icons have multiple commands. Tapping the Tab button will clear menus, but tapping and dragging left or right will bring up the Save As or Load file requesters.

The Undo button becomes a Redo if you tap and drag left.

Holding down the move button will allow you to drag a selection with your mouse. Holding down the shift button will allow you to add to a selection.

Dragging up and down on the magnifying glass will zoom in and out. You can scroll through various transparency amounts with the Opacity button.

The icon on the left changes the size of the brush nozzle and the one on the right toggles between brush and eraser.

Hold down the eyedropper to sample a color and hold down the hand icon to pan around your image with the pen.

The remaining buttons are cut/copy, Esc/Enter/Delete, Lasso/Wand and Select All/Deselect.

Below are the other toolbars included in the Surface Pro Artist ArtDock.


Sketchbook Pro


Not all programs benefit from having a custom dock. I've included Sketchbook Pro because it was part of Konartist3D's original archive, but I don't think it make much of an improvement to an already well designed program.

Not all programs benefit from having a custom dock. I've included Sketchbook Pro because it was part of Konartist3D's original archive, but I don't think it make much of an improvement to an already well designed program.

Paint Tool SAI

Paint Tool SAI's crowded UI really benefits from the custom dock, but I'm not certain these are the most appropriate functions to include. Your suggestions are welcomed.

Paint Tool SAI's crowded UI really benefits from the custom dock, but I'm not certain these are the most appropriate functions to include. Your suggestions are welcomed.

The Maya buttons dwarf the standard icons.

The Maya buttons dwarf the standard icons.

The precise selection and placement of commands is very flexible. Please send along suggestions if you think other tools should be added to the dock.

The precise selection and placement of commands is very flexible. Please send along suggestions if you think other tools should be added to the dock.

ZBrush is a little less intimidating with its custom dock.

ZBrush is a little less intimidating with its custom dock.

Installation instructions

First off, you need to install AutoHotkey, located here. 

Then download and unzip the Surface Pro Artist ArtDock here.

Copy the artdock folder to your C:\ drive.

Create a shortcut of the file ArtDock.bat and pin it to your desktop or taskbar.

Start the ArtDock and then your desired program (Photoshop, etc.). Tap the corresponding ArtDock program button.

Move the launcher by holding and dragging the top left icon. Move program toolbars by holding and dragging the program icon.

Next Steps

I've only tested the Photoshop toolbar thoroughly. If you encounter problems with any of the other toolbars, please let me know so that I can make corrections. I'm also not certain that Konartist3D has chosen the most appropriate commands for each of the programs. If you think there are more important shortcuts to include in the docks, please let me know. The toolbars can be shortened or expanded as necessary.

I'd like to add controls for additional software like Softimage and Mudbox, but I can't commit to doing so right away. If you care to contribute icons or program controls to your favorite software, please do so and share your work with the community.


If you're interested in learning more about AutoHotKey, RawInputControl, Paintdock, ArtDock and the rest, please visit this great thread over at TabletPCReviews: http://forum.tabletpcreview.com/artists/58400-artdock-guide-compatibility-links.html

To learn more about how to edit RawInputControl, download this pdf created by lblb: http://www.mediafire.com/download/hb2x1oj644jy33o/Instructions_RawInputControl_v3.pdf

Surface Pro is the number one Windows tablet for artists, but the user interfaces on most 3d graphics applications don't pass the touch (or pen) test.

UPDATE November 24: I'm relieved to report that the touchscreen issues described below appears to have been resolved by a firmware update released on Sony's tech support site. 

Kudos to TabletPCReview forum poster Miles Wolf, who first spotted the fix. 

I installed it yesterday morning from Sony's Japanese tech support site and haven't experienced the problem since. The bios update is now available on Sony's US eSupport site. 

* * *

ORIGINAL POST

As much as I want to keep the Sony VAIO Flip 15A for its beautiful 15.5 inch screen, today I've encountered a crippling defect that makes it useless as a tablet.

The problem had occurred a couple of times before today, but I did my best to ignore it because I was more focused on getting the laptop set up and so that I could answer the pressure sensitivity question for a few apps.

But today, the issue has occurred so many times that I'm tempted to just give up, pack it up and return it to Best Buy tonight (maybe I'll use the refund to pick up a PS4 instead).

The issue is that the tablet service will randomly stop running, making the Flip unresponsive to either pen or touch. A workaround is to run the calibration program again, which restarts the service.

This ridiculous inconvenience might be tolerable if you only had to perform it once or maybe twice a day. But I've had to do this no fewer than six or seven times today and I've only used the laptop for a couple of hours.

Normally, I'd give Sony the benefit of the doubt and assume I just got a bum unit, but careful reading of various reviews online all mention having had the problem at least once.

For example, here is a quote from Engadget's review of the Flip 15: "Also, while the touchscreen mostly worked as it was supposed to, it occasionally failed to respond to our taps or it registered our finger input incorrectly. "

And on the Sony Community, there is a growing thread on the problem. And just like they've done on complaints regarding fan noise, the response from Sony has been total silence. 

So if you were thinking of picking up a VAIO Flip, my recommendation is definitely to wait until Sony releases either a firmware fix or issues a recall.

Despite its 3-inch smaller screen, that Lenovo Thinkpad Yoga is looking pretty good right about now.  

Posted
AuthorRick Rodriguez
12 CommentsPost a comment

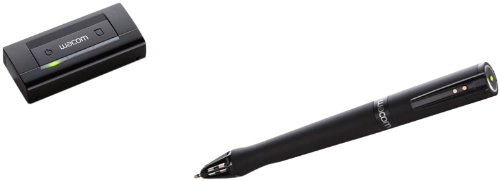
In a half lifetime littered with ill-advised impulse purchases, there are few I've regretted as much as my Wacom Inkling. 

The Inkling is a pen and digitizer you clip to any drawing pad to record your sketches. When connected to your computer, the analog drawing is captured. Sounds magical, right? Especially two years ago when I plunked down $200 for it. 

Once it arrived, the magic quickly wore off. Like all Wacom hardware, the Inkling is a premium, well-designed device. But the included Sketch Manager software was terrible, the digitizer missed many lines and the end results were pretty much useless.  

And so the Wacom Inkling went into my closet of obsolete technology to be forgotten...until this morning.  

The Autodesk Sketchbook Pro Facebook feed posted a link to this video produced in June for ImagineFX magazine by Nick Harris. It's the first time since its release that I've spotted the Inkling mentioned as more than a technological curiosity beyond Wacom's product page.

The Inkling's contribution to the workflow in this video is very brief, but it does demonstrate the pen's potential. I really like the idea of developing thumbnails on paper and transferring them to the pc for further refinement. I don't think the Sketch Manager software has been updated beyond version 1.1 released in early 2012, so it remains to be seen if it is compatible with the current versions of Adobe Photoshop and Illustrator. And the price has dropped to $99, so Wacom may just be clearing out remaining inventory.

In any event, I'll unpack the Inkling this weekend and give it another go, while also testing its compatibility with Windows 8.1 and the Surface Pro. I'll let you know how it goes soon.

This video by Nick Harris came with a step-by-step Sketchbook Pro and Inkling tutorial, featured in ImagineFX magazine issue 93. 


ADVERTISEMENT

Purchasing through this link directly supports this blog. 

Posted
AuthorRick Rodriguez
CategoriesTips

Reader Jora Thompson sent in the following this morning. I've been considering a Smudgeguard myself. When I first got my iPhone and later my first iPad, I was very fastidious about wiping down the screens daily. Now with five other touchscreens spread throughout the house, I'm lucky if I wipe them down once a week.

Do you use a Smudgeguard or a similar product? Have you tried making your own like Jora did? Let us know below. 

* * * 

Smudgeguard, the height of tablet pc artist fashion?

By JORA THOMPSON

Hey there, I love the page, visit it quite often for updates, I thought I might let you know of something that has been 2 birds, maybe 3, with one stone. Or at least something almost as cheap as a stone

I have used a Smudgeguard for years. I know a lot of illustrators don't use them. I wont go through the lengthy list of uses of a Smudgeguard for traditional and digital. but I will say for a traditional, or digital illustrator: completely worth it, and even more worth it if you work on a screen tablet.

Especially important if you do pencil work, ink work, or digital inking.

Anyway---

After 5 years, I just recently lost my Smudgeguard, sadly right before I got my Surface Pro.

I did not want to wait for shipping, so I went to local store and bought a pair of $0.50 one size fits all winter gloves (thinnest also happened to be the cheapest). Cut them to resemble a Smudgeguard (leaving only pinky, side of palm, and wrist covered.

And bingo! Now my hand effortlessly glides over the screen and will even after marathon sessions.

...and so rarely in life does this happen, and does it ever happen for $0.50?

The temporary solution to my small problem, totally negated a much larger issue I was having...palm rejection. My pro is not defective, just the way I hold my hand/lift pen and set down hand is just out of bounds so that the palm rejection is not reliable. With the glove I don't worry about this at all.

(the 3rd bird) Additionally I wonder if this might be a solution to the Cintiq Companion's on screen buttons, where in that when your pen is close, palm rejection does not let you tap the onscreen buttons with the free hand. Which would be a huge annoyance to me, to have to pull my pen hand away to tap a button.... So maybe if one can turn off palm rejection, pen in the protected hand, tappy tap with the other

Ultimately I will still be seeking a different smudgeguard, since I don't expect this one to last for years, and isn't as perfectly comfortable or as thin as the other.

I don't know if an 'official' smudgeguard is thick enough material to stop palm rejection. Also I think they are more expensive than they used to be, I'm sure a person could make their own. I imagine non-scratchy thin polyester gloves would be best to DYI.

And I have heard a lot of people say to me, "I don't want to have to have this thing on my hand when I draw/paint" 

I'm sure many inexperienced archers said the same thing in reference to drawing an arrow.

Also, with the a specifically made Smudgeguard, you forget your wearing it after a moment, many times I've gone to the store... sat down to dinner... still wearing it.

 
Posted
AuthorRick Rodriguez
CategoriesTips